In the middle zone of our country, it is almost impossible to achieve good harvesting of fruits from thermophilic plants without greenhouses. And in the case when there is heating of the greenhouse, then, perhaps, already in early spring, you can plant seedlings in it from all kinds of crops, as well as grow juicy greens to the table. In addition, the installation of most of the systems to produce heating of the greenhouse is done with your own hands, while you need to have only minimal skills.
Greenhouse heating methods
It makes sense to install heating systems in greenhouse constructions during their year-round operation, or during early spring when planting vegetables and herbs.
A heated greenhouse can have the following sources and methods of heating:
- the stove is a good heater for the greenhouse,
- water heating, where the heating source is a boiler operating on gas, electricity or solid fuel,
- heating the greenhouse with an electric or gas gun,
- heating inside the greenhouse structure by means of electric heaters,
- warming up the earth due to the water heating main or self-adjusting heating cable,
Heating in the greenhouse is allowed to do both separate and combined. For example, furnace heating can be connected to cable heating under a layer of soil in the ridges.
- After installing the boiler and the mains of the water heating system, soil heating can additionally be done from a separate pipeline.
- Heating the greenhouse with gas-powered guns is an efficient way, and gas consumption is hardly noticeable. The heating device takes up little space, does not require separate installation, has several levels of protection, so it is safe to use.
- If you decide to use electric heating as the main source of heating, then infrared heaters should be used for the polycarbonate greenhouse. They heat the earth and airspace, while stably maintaining humidity at the same level.
- Converters are heated unevenly: in the lower part, the temperature remains low, and in the upper part it becomes too high in a short time.
In this regard, converters are used only for temporary heating or in conjunction with other heaters.

Oven heating greenhouses
In greenhouses, during the off-season, one of the simplest devices for heating is a stove. Such its popularization is explained by cheap fuel. As it can be firewood, coal, sawdust, briquettes, etc. When stove-making and heating the greenhouse, you need to arrange a chimney to create a stable draft.
At the same time, the heating of the greenhouse is equipped not only at the expense of one furnace, but also through a chimney - a hog. Why do you need to deepen it, and lay the chimney along the entire greenhouse with access to the outside.
This option improves heat dissipation, however, so that the chimney works properly, it is not recommended to do burs longer than 6 meters. To remove soot, windows must be provided in the pipe, because of this, the pipe can only be placed between the ridges.
Furnace devices for greenhouse premises are brick and metal. The first option is good because the brick walls at the stove take longer to warm up, but such a heated greenhouse keeps heat perfectly and cools for a long time. Metal furnaces heat up quickly, but they have a low heat capacity and heat only when the fuel is burning. Let us consider in more detail each of these heating devices.
Metal furnaces
Such heaters for the greenhouse can be installed in buildings during operation during the off-season period, and at this time they work more efficiently than brick for the following reasons:
- metal furnaces are mobile. They can be installed temporarily for heating and heating in cold periods, and then cleaned for the summer,
- they don’t need to make a capital base, and the stoves do not take up much space,
- if you select a furnace with a specific design, you can connect a heating water main to it,
- metal stoves have a budget cost, since you can weld it yourself if you have the simplest skills from different available materials,
- you can install such a stove for heating yourself, and without dexterity on the laying of stoves.
But without water batteries or mains, the stove will heat mainly air. Therefore, it is recommended to mount it in the middle of the greenhouse with a small depression in the ground. And also some vegetable growers in such cases raise beds or place them on racks, where the temperature is much higher than below.
However, these furnace devices during heating have disadvantages:
- the impossibility of an automatic combustion process, you have to constantly monitor and load fuel,
- metal furnaces dry air during combustion, therefore, in a greenhouse, it is necessary to artificially moisten the air by installing water tanks.
Despite the disadvantages, stoves made of metal are in demand due to quick heating and the easiest to use heating method.
Installation of a metal furnace in a greenhouse
The first step is to determine the location of the stove. If it is originally planned to install it without a water circuit, then there is no better place than in the center of the greenhouse.
So, a step-by-step algorithm for installing a metal furnace for heating is presented:
Stage 1. To equip a solid base in a previously dug pit from a suitable material: brick, cinder blocks, crushed stone concrete mixture, etc.
Stage 2. Install the furnace, while paying attention to make it convenient to load fuel from the inlet side, as well as check the alleged removal of ash from the ash pan.
Step 3. Connect the smoke exhaust pipe, and place it in the greenhouse between the plants and the polycarbonate sheets so as not to damage them. At the same time, provide for cleaning the pipe from soot, for which you need to make a preventive hole. When installing the pipe, observe the fire safety requirements: the distance from the pipe to combustible materials of the structure must be at least 25-30 cm. All connections must be made through sheet asbestos, and the passage in the roof through the ceramic sleeve.
Stage 4. Expose the pipe outside by at least 0.5 meters above the roof ridge, and cover it with a protective cap against precipitation.
If a water circuit is supposed to be connected to a metal furnace, it is advisable to mount it in a specially provided vestibule or in a fenced place at the edge of the greenhouse. Do not forget about the place of fuel storage in the location of the greenhouse structure, otherwise, with frequent opening of the door, heating the polycarbonate greenhouse in winter will be ineffective.
Brick stoves for the greenhouse
Do-it-yourself heating devices for the greenhouse often work no worse than purchased devices. Moreover, this is the cheapest option, which makes it possible to observe all the nuances when placing in any greenhouse.
Using a brick oven, it is possible to successfully heat a polycarbonate greenhouse even in winter, due to its increased heat capacity. Any heating furnace is suitable for this, if only its productivity corresponds to the area of the room.
Moreover, for a standard greenhouse of 6 × 3 meters, you can build a furnace with a height of 210 cm and with dimensions of 70 × 50 cm.
To fold it, you will need:
- masonry red brick - 215 pcs.,
- fireclay brick - 85 pcs.,
- concrete mortar for the base - 0.30 m³,
- soot cleaning doors - 2 pcs.,
- ash removal doors - 1 pc.,
- furnace door - 1 pc.
Below is the phased masonry of a brick kiln:
Stage 1. The basis. First, you need to make a reliable foundation for the size of the future furnace. For this purpose, a recess is firstly excavated to a distance of 40 cm, then gravel about 10 cm is poured onto the bottom, formwork is made and concrete mixture is poured onto pre-laid reinforcement from rods.
Stage 2. After drying the foundation, lay the furnace according to the drawings on the clay solution. At the same time, near the combustion channels, the masonry is made of fireclay fire-resistant bricks, and the rest is made of red stove.
Stage 3. First, lay 4 rows of red brick on a solution of clay. Mount the ash pan door, fixing it in the opening with a wire.
Stage 4. Rows from 5 to 12 are laid of fireclay bricks on the refractory mixture, while the grate and furnace door are installed.
Stage 5. Rows from 13 to 15 are also laid out of fireclay bricks, then after overlapping the arch of the furnace, the masonry continues from red brick. After the 15th row, a door for cleaning soot is installed, and in the 22nd row - a damper for smoke exit.
Stage 6. Rows from 23 to 27 extend the smoke openings, and starting from the 28th row, a channel with narrowing is laid out. In the 29th row, a second smoke damper is mounted and from the 32nd row they begin to lay out a chimney of the required height of 4 bricks with a dressing.
On a note! For greenhouses with a small height, the furnace is installed with a horizontally located chimney - a hog.
Greenhouse water heating
The greenhouse is heated by a conventional water heating system by two methods: by connecting the mains to the circuit of the home heating system and installing a separate boiler.
Depending on the type of fuel available and inexpensive in the region, a boiler in a greenhouse is installed:
- gas,
- electric,
- solid fuel
- universal.
Despite the type of boiler installed, the heating system is the same and it, in addition to it, includes:
- batteries and pipes
- circulation pump
- expansion tank,
- control equipment
- collector,
It should be noted that in modern boilers, an expansion tank and a pump for water circulation are built-in inside the housing, so they do not need additional installation.
How to choose a boiler for a greenhouse
A natural gas boiler is considered the most convenient and economical for a water heating system in a greenhouse. It maintains the set modes in automatic mode, in addition, the price of natural gas is relatively low, so heating a greenhouse in winter is relatively cheap.
Solid fuel boilers can operate on wood, coal, briquettes, etc. Fuel is also relatively cheap here, but such heating devices need constant inspection and replenishment of the combustion chamber with fuel.

Electric boilers for water heating in the greenhouse are distinguished by automated operation processes, they are convenient for installation, compact and safe to use. But they have one significant drawback - the high price of electricity.
With available solid fuel, it is best to install a simple boiler for heating the greenhouse in winter, and then the cost of it will pay off in 2-3 years. In a small greenhouse, with its periodic use, it is not profitable to install a solid fuel boiler. It is better to put an electric boiler - it will not need a separate site and installation of a chimney pipe, and the costs for it will not be so high.
Calculation of radiators
To maintain a comfortable microclimate in a greenhouse, you need to calculate in advance the need for thermal energy. When such a calculation is done in a house, a simple rule is applied: approximately 10 kW of heat generator power should be consumed per 10 m 2.
To calculate the consumed thermal power in the greenhouse, this method is not suitable, here the heat losses are too large. A well-functioning heating system should completely compensate for the heat consumption, while it does not matter if this is a house or a greenhouse.
So, if the indicators of heat loss are known, then it will be possible to find out how much heating is needed and calculate the number of radiators.
How and how much heat leaves the greenhouse
About 25-30% of the required energy seeps with heated air through the gaps (windows, doors, transoms) and the exhaust hood. And also there is a leak of cold air at the junction of the polycarbonate with the foundation, the so-called infiltration. If the soil is not heated, then 5-8% of the heat leaves through it, and the farther from the middle, the greater the loss of heat.
The most increased heat loss is observed through the coating, we assume that for 8 mm material this characteristic is known and is equal to 3.3.
To calculate the consumption of thermal energy in the greenhouse, the following formula is used: Q syst. heating = kt x S agr x (Tvn - Tnar) x kinf, where
Q syst. heating - total power of the heating system
kt - the efficiency of heat loss of the coating (3.3),
S ogre. - the area of the greenhouse,
Tvn - Tnar - delta of temperature indicators outside (taken according to normative data from the SNIP documentation) and planned indoors,
kinf - the efficiency of infiltration, which expresses the heat consumption through gaps and gaps (approximately 1.25).
We calculate the entire performance of the heating system for the greenhouse and the number of radiators. Suppose a greenhouse has an area of 150 m 2. Polycarbonate with a thickness of 8 mm (3.3 W / m 2 × ° C) is used as a coating. In a greenhouse, the temperature is allowed above + 16˚, the lowest temperature for this area is fixed at –30˚ (delta will be 46). Infiltration is permissible, therefore a coefficient must be entered.
We get the total power consumption for heating the greenhouse:
Q syst. heating = 3.3 x 150 x 46 X 1.25 = 28.5 kW
To find out the number of radiators needed for a room, you need to apply the following formula: n = P: p, where
n is the number of batteries
p is the thermal power of one battery, taken from the passport, W,
P - total power consumption, watts.
The resulting number of radiators is equally distributed along the perimeter of the greenhouse.
On a note! For greenhouse constructions, it is better to use low batteries - this way the root part of the plants will warm up more rationally.
Installation of a water heating system
To install the boiler, it is recommended that the following steps be supported:
Stage 1. Installation of a gas or electric boiler in a greenhouse. There are two options. If the unit is wall mounted, then it must be suspended on a solid wall, if it is floor mounted, it should be installed on a solid foundation (concrete pouring, lined bricks, etc.). Solid fuel boilers are best installed in a separate vestibule.
Stage 2. Connection to the chimney of a gas and solid fuel boiler. For the first type of units, a coaxial outlet of the pipe in the wall is used (air circulation and exhaust from the combustion in one pipe). For solid fuel boilers, a stainless steel sandwich chimney is used and it is usually discharged through the roof according to the connection diagram in the attached instructions.
Step 3. Connect batteries or piping with ½ or ¾ inch pipe diameter to the heating system. Radiators are installed around the perimeter of the greenhouse, and the pipe line, as a rule, is placed on ridges for heating the soil.
Stage 4. Installation of an expansion tank. If in electric and gas boilers such tanks are usually built inside the boiler and do not cause problems during installation, then for solid fuel boilers they need to be installed separately. As a rule, they are suspended near the boiler at the highest point of the line.
Stage 5. Installing a pump for increased water circulation in boilers with solid fuels. According to the instructions, the circulation pump must be inserted into the return pipe near the boiler. In this case, a coarse filter must be inserted before the pump.
Stage 6.Installation of management equipment: pressure gauge, safety valve and air vent valve. Usually install appliances near the boiler on the collector,
so that it is convenient to adjust the pressure and temperature of the water in the system.
Stage 7. Pressure testing by air. After assembling the heating system, the line should be checked for sealing. To do this, pump air into the system with a compressor to a certain pressure indicated in the passport (usually up to 2-4 atm.) And allow it to stand for about 30 minutes. Then all joints and joints are checked with a soapy solution.
If the test was successful and did not reveal leaks, then you can bleed air and fill the system with water. Then, the line should be restarted, the pressure and temperature adjusted to weather conditions and put into operation.
Greenhouse electric heating
For this heating of the greenhouse, several types of heaters are used. A fairly simple method is heating the greenhouse with a heating cable. It is recommended to lay it under a layer of earth in the ridges, in which case a self-regulating cable can heat the soil to the desired temperature.
Instead of a heating cable, in a greenhouse with heated ground, you can use the ENGL-2 strip. It must also be laid under a layer of soil in a similar pattern, which are usually attached in the accompanying instructions. If the ridges are already equipped in the greenhouse, then it will be difficult to use a cable and tape.
Then you can use infrared heaters for greenhouses. They are installed, as a rule, under the ceiling, and the number is calculated based on: 1 kW of energy + 30% is consumed per 10 m2 of area (inevitable heat loss).
Such heaters can warm up in a semi-automatic mode, both airspace and soil to a depth of 10 cm, while the costs are small. To automate such a heating system, you need to connect temperature sensors to the height of the plant, that is, 80-100 cm. You need to install them in such a way that they do not get light from the heaters, otherwise you can not avoid errors in the readings.
Popular articles
The crops sprouting in the greenhouse are under the influence of all kinds of pests and are often susceptible to various diseases.
After the completion of all harvesting work in the fall, it is necessary to sanitize the greenhouse, which is an indispensable condition for its subsequent operation.
How and how to heat the greenhouse in the winter.
Lighting in the greenhouse is in demand during the off-season, when daylight hours are significantly reduced. As a result of this, artificial light in greenhouse constructions is needed in winter for the full growth and development of plants.
How to process a polycarbonate greenhouse in the fall to disinfect the soil.
Greenhouse and greenhouse: what is the difference?
Any summer resident knows about greenhouses and greenhouses, but many incorrectly classify these 2 types of structures for growing plants. The main difference between them is clear from the terms themselves. The meaning of the greenhouse device is to create a greenhouse effect. Hence its name.
A greenhouse or a greenhouse?
And the greenhouse not only prevents the wind from blowing out the heat received from the sun (as in a greenhouse). The space inside it is additionally heated by a heating system, which allows you to grow plants at fairly low temperatures or even year-round. Therefore, most of the buildings in our gardens, despite the familiar name, are not greenhouses at all, but greenhouses.
How to turn a greenhouse into a greenhouse?
What are the ways to heat the greenhouse?
Biological method
The law of conservation of energy is the foundation of our world. Energy does not disappear and is not taken from anywhere, it only passes from one form to another. Plants through the complex process of photosynthesis convert solar energy into energy of chemical bonds, synthesizing organic substances. They are used by animals and humans to sustain life and build their own bodies. And part of this energy finally remains in the manure.
Manure is not only valuable fertilizer
In the process of mineralization of organic substances (their decomposition into inorganic ones), the reverse process occurs - thermal energy is released. It is large enough and can be used to heat the greenhouse.
Greenhouses on biofuels (in Europe they were called "Russian") in former times were widespread. A variety of vegetables were grown in greenhouses heated by manure in the Moscow Region and near St. Petersburg, and they entered the capital markets in early spring: radishes and fresh salads in March, carrots and radishes in April, in May, cucumbers, and in June melons.
Horse manure is the best fuel; its “burning” temperature reaches + 70 ° С. But other types of organic waste (including food), as well as sawdust, straw, leaf litter and manure of other domestic animals are suitable for heating purposes.
All kinds of stoves
A greenhouse, like any other structure, can be heated with the help of heating devices of a very different design. Wood stoves, heat guns, electric heaters are suitable - the choice depends on the owner's capabilities and the availability of fuel or electricity tariffs.
Greenhouse wood heating stove
Among the brick wood-burning stoves, there are models whose design is specially designed for greenhouses - these are the so-called pine wood stoves with an almost horizontally located chimney. The smoke channel is arranged over the entire length of the greenhouse. In large industrial buildings, several such furnaces are installed. Even a candle can be used as a heater in a greenhouse: despite its small size, such a heat source can very well cope with a sudden spring cooling.
Of course, for growing early vegetables and winter use of a greenhouse heater from candles and pots will not be enough. If possible, it is better to maintain the temperature necessary for plants with the help of a boiler and heating radiators, or electric heaters. True, the use of such devices for heating also has many disadvantages. This is local overheating in the immediate vicinity of the heater, and the difficulty of heating the entire volume due to poor convection, and air drying. In addition, the stoves need to be maintained, and heating with electrical appliances is very expensive. Plants are easier to survive low temperatures if the soil layer in which the roots are located is warmed up. If the earth is cold, then they will not only suffer from this, but will also begin to starve, for example, poorly absorb phosphorus. Therefore, the most effective way of heating the greenhouse will be a warm floor - water or electric. Electric heated floors, unlike other heating appliances powered by electricity, are economical. Heating in the greenhouse can also be arranged on the basis of infrared film heaters. They can be placed both under the boxes with plants, and along the walls (in the form of thermal screens). In our market, the catalog of which combines the offers of different stores, you can pick up an infrared heater for your summer residence, look in the appropriate thematic selection. When choosing a heating system, it is necessary to pay attention to the overall dimensions of the room and its type, as for different materials, the required heating intensity will also vary. For example, high heat losses are characteristic of polyethylene, so a greenhouse made of this material will require more intense heating compared to a greenhouse made of polycarbonate. When arranging greenhouse heating, take into account the total cost of installing the system and its maintenance. Some heating options require serious financial investments, and their use in small greenhouses will be inappropriate. Others are simple and inexpensive to arrange, but consume a lot of fuel in the process. For the rest, the owner must decide for himself how beneficial it will be to use one or another heating option specifically for his situation. The main thing is that the system provides an even distribution of heat throughout the room, does not dry the air and creates optimal conditions for the development of crops. This option should be considered if it is possible to connect the heating of the greenhouse to the heating system of the house. Pipes laid from the house to the greenhouse need high-quality insulation. The boiler power reserve should be sufficient to ensure the required level of heating for both the house itself and the greenhouse. If the length of the pipeline between the house and the greenhouse exceeds 10 m, it is better to refuse to use such a system. There is also a way to organize autonomous steam heating. In this case, the boiler is installed in the greenhouse. Pipes and batteries are connected to the heating unit, the coolant is supplied. Water is traditionally used as a heat carrier. To ensure forced circulation of water, the system is usually equipped with appropriate pumping equipment. To organize air heating, air is used, heated in the furnace of a special boiler. Such heating is characterized by minimal cash costs for fuel and high rates of thermal return. About half an hour after starting the equipment, the air temperature in the greenhouse can rise by 20 degrees. An additional advantage of the system is the absence of the need to use any intermediate coolants. Air heating is best suited for regions with mild climates. In more severe conditions, it is recommended to use a complex of air and steam heating. In such a system, heat is generated as a result of gas combustion. You can equip the system both by connecting to a stationary gas supply, and by using fuel in cylinders. During the operation of the system, an intensive intake of air from the heated room occurs, accompanied by the release of water, carbon dioxide and other waste that is dangerous to humans and, of course, plants. In view of this, the arrangement of gas heating will entail additional costs for the organization of the ventilation system. Such heating is well suited for small greenhouses. When using it on large areas, the costs and complexity of the service can be excessively high. Modern electric heating units allow you to arrange effective heating of the greenhouse without much effort. Among the main advantages of such devices, it should be noted that in the process of their work exclusively heating of plants and soil occurs. The air does not warm up. He gradually receives heat from the heated earth. This allows you to equip the most efficient and economical heating system. Modern systems are equipped with sensors and temperature controllers, which gives ample opportunities for dividing the greenhouse into different thermal zones and providing the most comfortable conditions for each plant group. The main unit in such a heating system is a solid fuel boiler, which operates, as a rule, on wood or coal. The simplest stove heating system includes a solid fuel boiler and a chimney that leaves the greenhouse to the street. Additionally, you can equip the system with pipes and radiators, which will allow you to organize the most efficient and high-quality heating. The chimney needs regular cleaning of fuel combustion products. Both ordinary wood-burning stoves and modern long-burning boilers are available on the market. Such devices do not need frequent fueling and consume it as efficiently as possible. Installation of a solid fuel boiler directly in the greenhouse will lead to drying of air and soil, as a result of which the planted crops can simply die. To prevent this from happening, when installing a solid fuel boiler in a greenhouse, it is necessary to equip an air humidification system. It is usually sufficient to install a large container of water. Oven heating in the greenhouse is the most popular heating option. In addition, there is nothing complicated in arranging such a system - even a novice master will cope with the work. Solid fuel heating also unconditionally outperforms electric heating in terms of cost. That is why the procedure for organizing heating of a greenhouse will be considered on the example of stove heating. First step. In the vestibule of the greenhouse, lay out a brick from the stove on a pre-equipped foundation. Second phase. Lay the chimney along the entire length of the room. The third stage. Take the flue pipe out of the greenhouse on the other side. As a result, the combustion products will be effectively removed from the room, and the heat will remain inside. First step. Prepare a large metal barrel. Paint its inner surface in two layers - this will provide protection against corrosion. Second step. Make several holes in the housing. You will connect a chimney to one of them. Others will be used to connect the faucet and expansion tank. Third step. Weld a sheet metal stove and insert it into the prepared barrel. Fourth step. Weld a piece of pipe for connecting the chimney to the hole in the barrel. The total length of the smoke exhaust structure should be at least 4-5 m. Fifth step. Install the expansion tank on the barrel. A capacity of 20-30 liters will be enough. You can buy a tank or weld it yourself from sheet metal. Sixth step. Route the pipes around the greenhouse. Lay the pipes on the ground in increments of 120 cm. Such an arrangement of heating elements will contribute to the effective heating of the soil at the location of the plant roots. Seventh stage. Install a pump to force the system to circulate water. Turn on the water supply and make sure all connections are tight. If leaks are found, seal them immediately. Only after this can you begin to test the stove and take the heating system into continuous operation. For work, you will need a direct empty gas cylinder, a coil (a U-shaped tube with a thread at the ends), a metal grill, a gate valve, hinges and two metal door handles. You should also prepare a pipe for the chimney taking into account the length of the greenhouse, a welding machine with electrodes, a drill and a grinder, pipes and a radiator for the heating circuit. For the front wall of the furnace, a small sheet of steel is required. From these simple devices, a boiler with a water circuit is assembled to heat the country greenhouse. We put the balloon on a sheet of steel, circle it with chalk, cut the front wall according to the marking. Cut 1/3 circle. From this piece we make the ash pan door by welding a handle and cutting out a semicircular piece for the bottom of the drawer from the second part of the cylinder. In a larger piece of wall we cut a rectangular hole. We weld the loops, the handle and the latch (valve) to the cut rectangle. The door should close the firebox tightly. We introduce a coil (water circuit) into the furnace. We make markings for the coil, drill two holes in the upper part of the furnace to output the ends of the threaded pipe. We weld the coil to the metal plate and the upper part of the furnace. Equip the chimney. Cut a hole for the pipe in the upper rear of the furnace. We weld a pipe for connecting the chimney. We monitor the quality of welds, otherwise the draft and operation of the boiler will be impaired. We weld the chimney pipe so that it will pass at an angle of about 20 degrees through the entire greenhouse. The chimney will exit through the back wall of the greenhouse, rising 1 meter above the roof. Be sure to think about the thermal insulation at the point of contact between the walls of the greenhouse and the chimney so that there is no fire. We connect the chimney pipe to the furnace pipe using sheet asbestos and a sleeve, tightening it with wire. To the outward ends of the coil we connect metal pipes for the water circuit. In the harness there should be an expansion tank and a pump that will pump water through the pipes. Thus, the water heated in the coil will enter the radiator, and when cooled, it will again fall into the boiler. The chimney pipe will serve as an additional source of heat. Also, a long chimney will reduce heat loss, increasing the efficiency of the boiler. We install the furnace in the greenhouse, having previously built a brick or concrete base and laid out a brick screen on three sides of the furnace. For stability, the furnace can be equipped with legs made of any reinforcement or long products. We load fuel into the furnace, rekindle, adjust the draft by opening or closing the furnace / ash pan door. Do you like the article? Step 1. Prepare a solid base from paving slabs, bricks or tightly packed earth. It is better to position the furnace in the center of the greenhouse so that the heating is more even. Furnaces with an air or water circuit are installed in any convenient place, observing the fire distances specified in the passport. Step 2 Install the stove on the prepared surface, check whether it will be convenient to load firewood and remove ash. In the presence of a major wall, the furnace is installed with a back wall to it. Step 3 Connect the chimney of the desired diameter to the smoke pipe using heat-resistant sealant. The installation of the chimney must be carried out in accordance with the scheme. Narrowing the chimney is not allowed. Step 4 If necessary, connect a water or air circuit. Note! Furnaces with a water heat exchanger must not be heated without a filled heating system, as this will lead to its damage. In order to ensure a favorable microclimate in the greenhouse, it is necessary to first determine the required number of radiators. Calculation for greenhouses with a height of less than 3 meters can be carried out according to a simplified scheme - by area. The area is determined by the formula: WhereS is the area of the greenhouse, m 2,a andb - length and width of the greenhouse, m The calculated thermal power of the greenhouse is determined by the formula: WhereP is the calculated thermal power, W,S is the area of the greenhouse, m 2. Calculation of the number of sections of the radiator: Wheren - the number of sections of the radiators of the selected type,p - thermal power of one section of the radiator, indicated in the data sheet, watts. The resulting number of sections is evenly distributed throughout the greenhouse, distributing them to several radiators. Note! For greenhouses, it is better to choose radiators of the minimum height - so the basal space and soil will warm up fully.
“Lampshade” made of ceramic pots to increase the efficiency of a candle heater. Photo from mihalych-lv.livejournal.com
Greenhouse electric heaterKeep your feet warm
The "warm floor" system for heating the greenhouse. Photo from teplichniku.ruWhat to consider when choosing a heating system?
 Polycarbonate greenhouse
 Greenhouse heating
Steam heating
Air heating
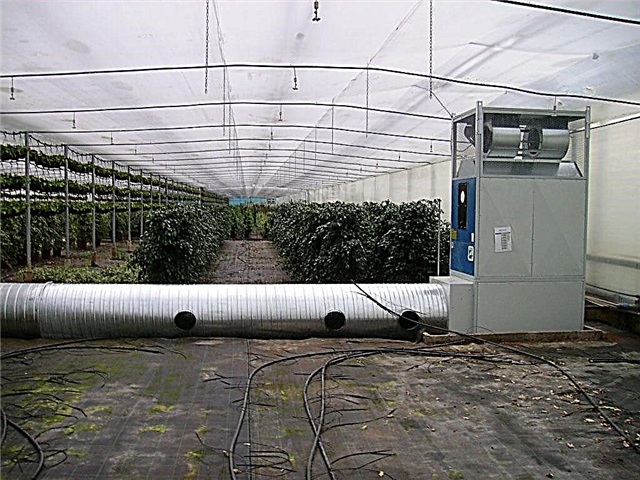
 Air heating
Gas heating
 Gas heater
Electric heating
 IR heaters
Furnace heating
 Furnace heating
First option
 Hog base and blower with side air intakes
  Firebox and chimneys
 Continuation of the furnace and overlapping of the hog
  The furnace is connected through cutting to the foundation of the greenhouse
  Above the firebox, a water tank
  A bed on the furnace
  Greenhouse furnace
Second option
 Solid fuel boiler for greenhouse
  Solid fuel boiler for greenhouse
  Solid fuel boiler for greenhouse
 Heating pipes
Gas cylinder greenhouse boiler
 We cut the balloon in half
  We cut the balloon in half
Step 3
 Door
Door  Firebox and ash pan door
Step 4
 Try on a coil
  Cut holes
  Fasten the coil
  Fasten the coil
  The coil is fixed
Step 5
 Chimney hole
  Connected chimney
Step 6
 Boiler piping
  Installing a pump in a greenhouse heating system
  Greenhouse heating scheme
  Example chimney leads through the wall of a greenhouse
Step 7
 Oven in action
  Now the greenhouse can be used year-round
Save so as not to lose!Installation of a metal furnace in a greenhouse
Calculation of the number of radiators
Watch the video: Unheated Greenhouse Troubles. Our Solution! (December 2024).