Sealing up cracks in a wooden floor may be needed in various situations, the reason for which is one - drying boards:
- if the floor creaks,
- when repairing and replacing flooring,
- if the apartment is flooded,
- violation of the technology of laying boards.

Drying boards is one of the most common causes of crevices.
These are not all options, but the most common. In any case, if a major repair is carried out for any reason, you will need to eliminate the cracks in the floor with your own hands.
Ways to eliminate gaps
There are many options that will help to cope with the problem. The choice depends on the design features of the floor, the materials available and the type of flooring:
Popular floor repair methods
- the use of foam with foam (suitable for eliminating gaps between the wall and flooring),
- the use of sawdust mixed with adhesive,
- wood putty,
- a composition consisting of paste and pieces of paper,
- cord closure,
- driving rails and wedges,
- tow,
- a mixture of epoxy adhesive with cement,
- thick oil paint with sawdust,
- plywood sheets (for difficult cases when there are a lot of cracks in the floor),
- sealant seal.
Depending on the complexity of the situation, you can use any of these options. Further details about the technology of the most common methods.
Before starting work with your own hands, you need to clean the surface of the boards from dirt, dust and debris.
You can treat wood with an antiseptic. This will extend the service life and protect against damage by various microorganisms. After that, you can fill or fill the cracks.
Construction foam
It is used for the perimeter of the room. Work is carried out in the following order:
- remove skirting boards, clean the surface of dirt and dust,
- if necessary, put pieces of foam in the slot,
- fill the gap with foam,
- wait for the drying time and cut off the excess,
- then you need to putty the surface,
- after the putty is dry, install the baseboard.

A universal solution for repairing a wooden floor is construction foam - it does not retract, does not shrink
Sawdust with glue
Suitable for sealing in any place. It is carried out in the following order:

The mixture of sawdust with glue should have a consistency similar to thick sour cream
- small sawdust in a convenient container is poured with boiling water and mixed until smooth,
- wait time for swelling and cooling, mix,
- add the adhesive composition (PVA or carpentry) to the mixture and mix thoroughly,
- apply the composition to the coating with a spatula and tamp inward without effort,
- the composition is leveled and the surplus removed
- drying time - 2-3 days,
- after drying, grinding or scraping of the coating is performed.
There is a second option for the preparation of the composition - with the addition of cement. It is prepared as follows:
- 2 parts of glue are mixed with 15 parts of warm water,
- 5 parts of cement and 5 parts of sawdust are added to the solution,
- the mass is mixed and infused for 5-7 minutes.
Use such a composition must be warmed up. The disadvantage is a long time of complete drying due to the presence of cement (about 2 weeks).
Putty
Suitable for small crevices. It is best used as a preparatory step before plywood flooring. Disadvantages - fragility, cracking and spilling. Allows you to easily prepare the mixture without complex operations. The work is carried out in the following order:
- prepare a solution and a tool - a narrow rubber spatula,
- putty is applied to the surface of the joints, while it must be pressed into the cracks,
- drying of the composition
- leveling using abrasive products.
Putty quickly removes cracks, but over time, again requires floor repair
Do-it-yourself putty allows you to quickly get rid of cracks, but soon repair can again.
Driving slats and wedges
Stages of the work:
- preparation of slats narrowed in the lower part and coinciding in size with a gap,
- processing slats and gaps with PVA glue,
- gluing the slats into the slot, hammering with a rubber mallet or ordinary, but through a wooden board,
- if necessary, after the glue dries, the protruding part of the wedges and slats is removed with a planer,
- leveling the floor with a stain or stain.

Floor repair with slats and wedges
Plywood laying
Suitable for wide slots if the floor is badly damaged and needs to be reinforced. In this case, it is not effective to apply the sealing of individual slots. Plywood allows you to carry out work with minimal labor costs.
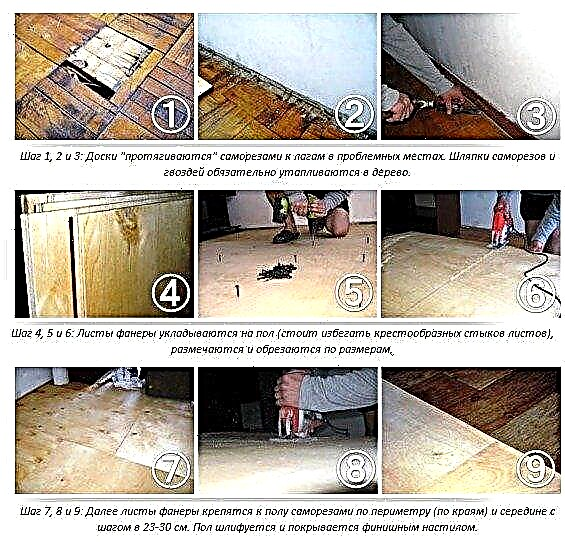
Plywood laying process
- If necessary, putty is used as a preparatory stage. Only certain flaws can be glossed over. Putty will increase the reliability of the repair.
- Lay out plywood sheets on the floorCustomize the sheets to the required sizes.
- Fastening is performed on self-tapping screws. In this way, you can quickly close all the existing floor defects.
Sealant
For work, choose compositions on an acrylic or silicone basis, designed for work with wood. The advantage is the lack of the need for complex formulations and ease of application. The sealant packaging usually has a convenient shape and a nozzle-syringe, which is easy to fill all the cracks.

The sealant has a convenient shape and a nozzle-syringe, which can easily fill all the cracks
It doesn’t matter what method is used to fix the problem, putty, other compounds or materials, you need to follow the technology and carefully prepare the floor surface. This will delay the next overhaul of the floor.
Korovin Sergey Dmitrievich
Master of Architecture, graduated from Samara State University of Architecture and Civil Engineering. 11 years of experience in design and construction.
Link to the article
Link to the article
The creak of wooden floorboards suggests that the boards have dried up during a long operation and are not securely attached to the logs. The more annoying this creak, the more often the thought comes to finally do the repair. Over a centuries-old history, mankind has come up with enough ways to repair old floors, but in recent years, new approaches to solving this problem have appeared. In this article we will look at traditional methods and modern technological innovations.
We completely dismantle the floor
The condition of the creaking floors may be such that a complete dismantling and bulkhead removal will be necessary. To successfully complete this procedure, you will need some determination to destroy, a small crowbar and a nail clipper. It is possible that the logs will be slightly damaged. Torn boards need to be carefully examined and choose the most healthy and strong. If necessary, they can be slightly trimmed to even out the deformed edges. It is also possible to replace completely unsuitable copies with new ones, then you will have to additionally buy material. Pay attention to the quality of the new floorboards: they should be dry and even, without chips, cracks and falling knots.

After all the preparatory work, we lay the boards anew, fitting them tightly and fixing them to the logs with self-tapping screws. For a tight connection, you can use spacer wedges - an old and reliable way of craftsmen. It is better not to use ordinary smooth nails for a wooden floor, with time they weaken when walking, and the hats come out. It is better to use flat or twisted nails that hold the floorboards much stronger than ordinary. Complete dismantling is done when it is already pointless to try to repair too wide cracks. In the language of the masters, this is called "sorting the floors."
Partially dismantled

A boardwalk can look quite strong, and creak appears only in some areas. It is in these places that you can carefully remove the floorboards, replacing them with new ones. In this case, an exact fit of the new boards will be needed so that the coating is without gaps. A marking pencil, a metal ruler and an electric plane are useful for this procedure. Be prepared for the fact that you will have to do a fairly careful fit of the new board, gradually trimming it in place so that it accurately fits into the space between the old floorboards. But in most cases, repair work is limited to sealing the resulting cracks, and there are several ways, depending on the width of the lumen.

We repair wall cracks
Between the plank flooring and the wall, it is customary to leave small slots for ventilation and for the free movement of wood when the material expands from high humidity. These gaps can increase over time to such an extent that replacement of the baseboard is no longer necessary. Such slots can be covered with foam.
First you need to carefully remove the skirting boards, and clean the cracks from dust and dirt. Then we fill the gap with polyurethane foam, and after it has completely dried, we trim it according to the floor level. The porous structure of the foam can be treated with a thin layer of putty and then painted with the total floor area.
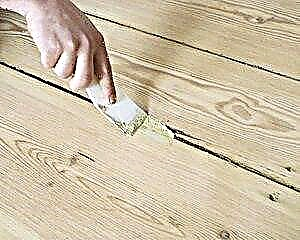
Sawdust - repair classic
The well-known and fairly reliable method with sawdust may well solve the problem of small gaps of wooden floors. The composition of the paste is simple: mix small sawdust with PVA glue to a thick mass. We clean the gaps and prime with the same glue. After the primer dries, we proceed to the putty procedure. With a thick spatula, we press the adhesive mass into the cracks and smooth it carefully. After two to three days, the putty will completely dry and harden. Now it can be sanded with sandpaper, planed or recycled with a machine. In some cases, some cement is added to sawdust PVA to increase the strength of the repair material. Everything happens according to a well-known scheme, but the paste needs to wait about two weeks to completely dry.

Expert Advice
Sawdust perfectly solves the problem of small crevices even when your floors are covered with clear varnish. Then the dusty wood can be mixed with the same transparent varnish and close the gaps with this paste with a spatula. With carefully executed work, even grinding is not required. Epoxy resins are also used as a binder for sawdust. Such a composition can successfully repair not only cracks, but also various dents, chips and cracks in a wooden coating.
We use putty for wood
You can significantly simplify the process of repairing cracks, if you buy a ready-made putty on wood. Usually it is used when the cracks are very small. It is also pressed with a spatula, smoothed and sanded after drying. If you decide to cover the wooden floors with transparent varnish, then you can use ready-made putties with pigments, the color of wood. If necessary, you can add pigment yourself, achieving accuracy of a suitable shade for pine, oak or walnut.

We repair using racks
This is a more complicated repair method, but if the cracks have the same width, it can be successfully applied. The difficulty lies in the fact that thin rails need to be given a slightly wedge-shaped shape so that they easily enter the slots and close them tightly after a little tapping. The fitting process requires particular care - the slats should not be too wide open floorboards. During installation, we use PVA glue, which is applied to the walls of the slots and to the rails. Clogging into the slot is carried out through a wooden gasket with an ordinary hammer, and the protruding parts of the rails are removed with a planer, after the glue has completely dried.
We use modern sealants
Many types of polymer sealants are able to solve the problem of cracks quickly and efficiently. These compounds also include tubes with so-called liquid nails. The application of the sealant is convenient in that the adhesive can be squeezed out in batches through a narrow nozzle in the form of a syringe. Thus, you can fill the gaps of different widths with sealant, cutting off the plastic tip to the required length.
Almost all modern sealants have sufficient viscosity and good adhesion to any building materials. The elasticity of the composition is such that it eliminates the annoying creak of floorboards with dense filling of cracks. Acrylic sealants create an even and durable joint layer and are well painted. Silicone and paint are not "friendly", but much more durable than acrylic. You can apply composite compositions of silicone with acrylic, in which all the positive properties of sealants are combined. With such repair methods you can solve the problem of wood floor gaps easily and with a good result.
Options for repairing wooden floors
There are three ways to eliminate the disadvantages of a natural wood coating, such as cracks.
1. Dismantling the entire flooring followed by overhauling the floorboards. Such a large-scale work is performed when it is assumed that the laths of the crate are damaged, on which the boards are fixed. In this case, repairs are carried out using a small crowbar and a hammer with a nail puller. This method is used if the sealing of cracks in a wooden floor due to their large size is difficult.
The sequence of actions is as follows:
- since some boards, and possibly the elements of the crate, became unusable, they need to purchase a replacement - new materials
- the floorboards are carefully sorted, the undamaged products are laid separately. If necessary, they are planed and thereby align their edges, which are slightly shriveled,
- when the preparatory work is completed, the floor is finished again, fitting boards tightly and attaching them to the lags.
2. Partial floor dismantling. It is made if wide gaps appear in separate areas of the coating and for this reason the floorboards began to creak. Flooring elements are removed and new boards are laid instead. Typically, the second option is used in conjunction with the third, most common.
3. Most often, the sealing of floor surface defects is done in a variety of ways.. Depends on the scale of the upcoming work than to close up the cracks in the floor between the boards better.
Eliminating gaps between walls and floorboards
Defects, such as in the photo, may appear on the surface of the floor in various places, which affects the technology for their elimination and the materials used for this. During the installation of the flooring, small gaps are specially left between the walls and boards to ensure ventilation in case the floorboards expand due to sudden changes in temperature conditions.
Sometimes over time, they become too wide, and the problem of how to remove cracks in a wooden floor becomes urgent. Repair can be done using construction foam, which, if necessary, add small pieces of foam.

The work is performed in the following order:
- First of all, they remove the skirting boards,
- cracks clean from dust and dirt accumulated in them,
- then the defects are covered with foam, if necessary, pieces of polystyrene are placed under it,
- when the foam dries, its excess should be cut with a sharp knife flush with the floorboards,
- it is better when the jointing in the wooden floor between the walls and the boards is done with putty, so that dust does not accumulate in the foam structure,
- after solidification of the putty, the plinth is returned to its place.
Elimination of gaps with glue and wood chips
All areas of the floor surface can be repaired using adhesive. You can make it in one of the ways described below.
- It is necessary to prepare small sawdust: they are placed in a special container and filled with boiling water.The mass is stirred until it becomes homogeneous. Sawdust should swell within 1-2 hours. After the mixture has cooled, it is mixed again.
- Glue is poured into the already prepared sawdust (use PVA or carpentry). The mass is interfered until its consistency is viscous and has sufficient adhesion.
- At this stage, prepare the floor - you need to clean the cracks from dirt and dust. If necessary, their upper part is slightly expanded.
- Using a narrow spatula, the adhesive mixture is placed in the slots where they are tamped. The composition on top is leveled and its excess removed.
- After a few days, when the mixture is completely dry, the cracks are sanded and eased with a special machine.
- In this case, the repair of cracks in the floor is carried out by a composition whose components are sawdust, glue and cement. You need to take 2 parts of glue (PVA or carpentry), add 15 parts of warm water and mix them until smooth. Then 5 parts of cement are poured into this mass.
- The composition is mixed and set aside for 10 minutes. If you need to give it a shade of wood, you can add thick oil paint or a special coloring pigment to it.
- The cracks between the floorboards are cleaned and coated with glue, which is part of the repair.
- The prepared adhesive mass is slightly warmed up and immediately close the cracks with a narrow spatula, while trying to make the surface even.
- For the composition to completely dry, it takes about two weeks. Then the cracks are made perfectly smooth with abrasive products.
This option is used not only to solve the problem of filling the cracks in the wooden floor, but also to level the floor surface, making it smooth.
Filling cracks with putty
If there is no desire to mix a complex compound or there is no time for this, you can purchase wood putty in a specialized store and fill up the cracks with it. This method is used when surface flaws are insignificant. You should be aware that this material can be filling (up to 5 millimeters) and finishing (up to 1 millimeter). Similar problems arise with laminate flooring. Before you close the cracks in the laminate, you need to completely look around, only then choose the best way to seal the cracks in the laminate.

The disadvantage of this method is that the putty begins to crack and crumble over time. For this reason, puttying of cracks in the wooden floor is used when further old boards will be covered with plywood flooring.
The composition is applied with a rubber spatula, carefully pushing it into the cracks. After drying, the finished surfaces are smoothed using abrasive products.
Elimination of gaps with paste and paper
This option is simple and cheap. Required: paper, paste and a small amount of copper sulfate. The last component is necessary so that small insects do not settle in the glue mass in the future.

The process step by step is as follows:
Sealing cracks with a cord
This method has been known for a long time and it is used to seal cracks not only between floorboards, but also when repairing walls, when a piece of synthetic cord is selected in accordance with the size of the hole. The application of this option not only solves the problem of how to close the cracks in the wooden floor, but also helps to get rid of the creak of floorboards.
From the materials to be prepared: cord (hemp rope), PVA glue (carpentry), sawdust, putty. The rope is completely lubricated with glue and a mixture is made of sawdust, adhesive and putty.

The cord is placed on the slot, laid it inside so that to the top of the floorboard was 2-4 millimeters. This distance is filled with a mixture with a small margin from above, since the putty composition shrinks during drying.
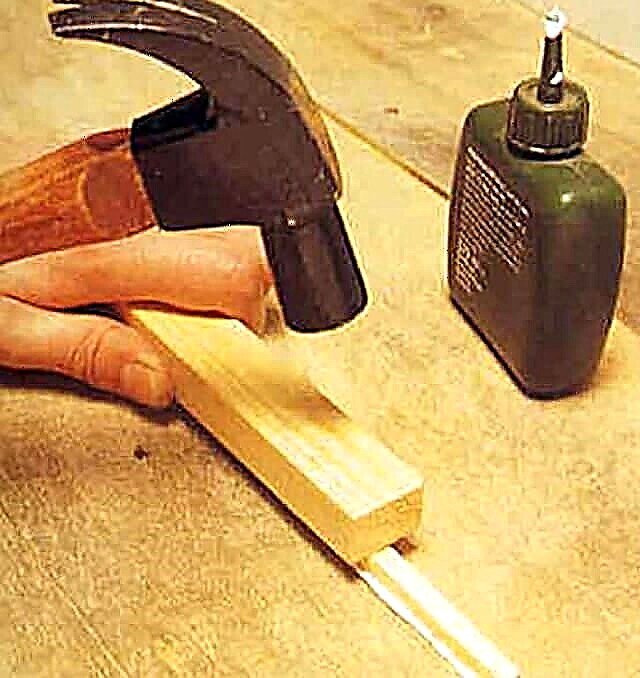
Elimination of cracks with the help of slats (wedges)
It will require thin slats, hewn to the corner in the form of wedges. These wooden elements should completely cover the cracks and at the same time do not burst them much.
The work is carried out in stages:
- cracks clean and slightly expand their upper edge,
- according to the size of the flaws, a rail is made having a narrowed lower part. A wooden wedge should easily enter a pre-cleaned slot,
- a spot of a flaw in the floor and the rail is thickly coated with glue
- the wedge is glued into the gap, knocking out with a rubber hammer. You can put a plank on top and drive a rail with a home hammer,
- in the case when the wedge does not fit completely into the slot, a small part of it that protrudes above the surface is removed with a planer, provided that the glue is completely dry.
When this option is used, than to cover the cracks in the floor, the color of the drive-in rail will strongly stand out on the repaired surface and therefore the wedge is covered with a stain or painted with carefully selected paint.
If the floor is covered with a thick layer of paint, which near the cracks has cracked and peeled off from time to time, it will help to remove the building hair dryer. You can also use special nozzles on the drill that have a soft iron brush, or use sandpaper mounted on a grinder.
Other options for removing gaps
Modern materials are available in building materials stores to qualitatively restore the appearance of the coating.

In addition to the above methods for repairing wooden flooring, other methods for solving problems regarding how to cover cracks in a wooden floor are quickly and most importantly inexpensive:
- Plumbing tow. The material known to many consists of flax fibers. It is impregnated with wood glue and rammed into the gaps using an improvised tool. After the glue has completely dried, the places of cracks are painted in the same tone with the floor surface.
- A mixture of cement and epoxy adhesive is ideal for repairing flooring with small gaps. The components of the composition are taken in equal proportions. The mixture is poured into the gaps with the top, since the mass will then sag. Epoxy adhesive mixed with cement hardens quite quickly and therefore does not have time to seep under the floor. The places where there were cracks are sanded and painted.
- A homogeneous mass made of fine chips (sawdust), varnish and thick oil paint in a ratio of 4: 1: 1, is also great for eliminating cracks, and different in size. Work can be done at a time when a flaw in the coating is poured immediately. In some cases, several steps are required - then layer by layer is applied to the edges of the hole being machined. The second option is used when it is necessary to eliminate a large gap.
- Using sheets of plywood, you can cover the old floor with wooden boards. This method is used when there are so many gaps between the flooring boards that it takes a long time to eliminate them. Sheets of plywood are fixed on the floor surface using self-tapping screws. As a result, all the flaws of the floor surface will become invisible.
- Sealing cracks in a wooden floor with sealant. This method is convenient in that the composition is conveniently packaged and there is a nozzle in the form of a syringe. Such a special device helps to fill both a wide gap and a fairly narrow one. To do this, the tip is cut to the desired thickness. A sealant can not only eliminate flaws, but also creak floorboards. The contents of the package spread under pressure and thereby fill the entire gap, without any effort. Sealant is a reliable and durable material that eliminates the problems with flooring for a long period.
A good choice of materials for eliminating cracks in the wooden floor can be called sealants that are produced on acrylic and silicone bases. They are designed to work with wood. They are not difficult to apply and they dry quickly.
The advantages of sealants are that they are elastic and the seam will expand and contract with the change in the parameters of the floorboard. If you put putty on top of them, the joint will become almost invisible.
When there are no skills in the preparation of special compounds, but it is possible to purchase finished products for floor repairs, you can stop at the choice of sealant.
Why close the floor gaps
Before you begin to eliminate gaps in the floor, you need to find out why these defects occurred.
- If the floor is covered with new wood, it will most likely dry out. An annual coating shift may be required, which will take three years.
- If the cause of cracks in the wooden floor was the vigorous activity of rodents, it is necessary to take measures to eliminate their colonies, otherwise the holes will reappear.
- If the boards are installed incorrectly and vibrate relative to each other, only nailing them to the logs will help.
Attention! Good options for arranging flooring are oak and coniferous wood.
It is necessary to get rid of cracks in the floor so that the coating continues to fulfill its important functions:
- provide the necessary thermal insulation, keep warm in the room, do not let cold air masses through the gaps,
- protect from third-party sounds and noises - the tree conducts sound waves well, so holes in the boards can exacerbate the problem,
- protect the premises from moisture, mold and pests.
After competent sealing of cracks, the boards will not rub together and publish unpleasant creaks.
Attention! The wooden floor needs ventilation in the form of ventilation. If it is decided to eliminate them, it is necessary to draw a vent through the room itself.
Hard putty on wood
 Repairing using finished putty on wood is the easiest embedment option. Factory putty will free the master from the preparation of complex compounds, will help to quickly cope with the work.
Putty is suitable for eliminating small cracks. If the flaw area is large, the composition can quickly crack and crumble. Ready putty can also be used in the case when it is planned to lay another floor covering on the wood.
Work order:
- If necessary, the slots are expanded with a spatula or a screwdriver so that the solution is applied more easily.
- Cracks clear of dust and debris.
- A narrow or rubber spatula captures a certain amount of putty. Then it is applied to the crack, trying to push it as deep as possible.
- After the putty dries, after about 1-2 days, the surface is cleaned and sanded with sandpaper.
Attention! The disadvantage of factory putties is a rather limited color palette, due to which the seams become visible to the naked eye.
Close up tow
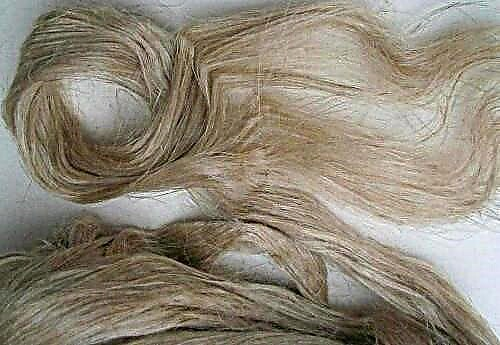 Sealing gaps tow is considered the "old-fashioned" way and also does not require much effort. Tow is traditionally used in plumbing to seal threads and pipe joints. This coarse fiber is a bast processing product. It has a high degree of hygroscopicity, strength, wear resistance, is safe for health.
To close the cracks in the wooden floor, the tow must be moistened with glue. Then the fiber is carefully driven into the gap, trying to fill the entire space. After the glue dries, the floor can be painted in the desired shade.
The tow can be replaced with a synthetic rope. It is impregnated with PVA glue and used in the same way. After drying, the remaining rope can be cut off and the surface painted.
Gap sealing technology
Often, a year or two after the flooring of the wooden coating, cracks appear between the boards. Boards are reduced in size during the drying process. This process is natural and normal, but the result is not happy. There is a cardinal decision - to remake everything anew, reuniting the removed boards in a new fashion and adding a couple of new ones. But not everyone wants or can do it. This seems to be too complicated. Yes. Not easy. But other methods of sealing cracks are no simpler and take no less time. But let's figure out how to solve this problem.
 If you properly close the cracks in the wooden floors, he will delight with his appearance
Than to close up small cracks
If the cracks are still not too large - 1-2 mm, you can use repair compounds that simply cover them. For these purposes, use:
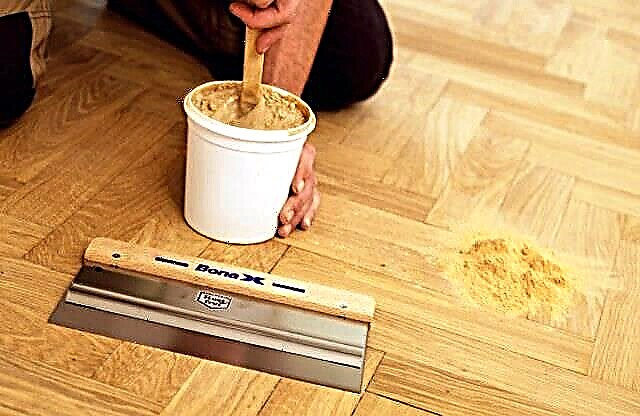
- A mixture of sawdust with PVA or wood glue. Sawdust takes only the smallest, more like wood dust. The paste is kneaded from glue and wood dust, and the slots are filled with a rubber spatula. Small volumes are immediately kneaded - the paste begins to quickly set and harden. A small tubercle should be formed above the gap, and wipe off excess from the boards with a damp cloth. The tubercle decreases as it dries. If you guessed with height, the result will be a plane with the floor. You can go another way - to cover almost flush with the boards, and if after drying the composition there are recesses, they must be leveled by re-filling.
 This is the consistency you make “dough” for sealing joints Sealant for wood. They are painted in a color close to wood. It’s not always possible to select perfectly, but usually it’s not too striking. When sealing gaps in a wooden floor with sealant, it must be applied with a small slide. When dried, it also decreases in size. If the polymerization time is almost over, and the composition is still sticking out over the boards, it can be cut with a sharp and thin knife (clerical or construction), sanded with sandpaper. One way or another works better. Depends on the type of sealant.
 Sealant for wood with tinting
After such repairs, the floor can be painted. If the color is successfully chosen, it is possible to varnish. Most likely, it will not work with wax or oil - neither the mixture with PVA, nor the sealant will be tinted and will stand out very much.
Close up large cracks
When restoring an old wooden floor, the cracks can be half a centimeter or more. To solve these problems, there are several methods. The first - all the same bulkhead and rallying of boards on a new one. But there is one trick. Old boards around the edge are often deformed. To avoid problems when rallying, carpenters pass between the boards with a hacksaw. So the edges are aligned, and two in one pass, and immediately flaws are revealed and you can reject badly damaged boards. For owners of a manual milling cutter, the process can be simplified by using a milling cutter of the appropriate size.
If a bulkhead is not possible (for example, partitions are installed on top of the floor), there are other options for closing the cracks:
- Take a woven thick cord, impregnate it with PVA or wood glue. The cord should be thicker than the gap. With great difficulty should be driven into the lumen. The impregnated cord is tucked with a core and a hammer, deepening it to about the middle of the thickness of the board. After the glue dries, the remaining gap is filled with a paste of PVA and wood dust.
 We close the cracks with cords and putty on top. From the dried wood, slats are cut. The width of the slats is a little large than the width of the slit. But this is not just slats, but along the long side sharpened in the form of wedges. They are also lubricated with glue, pass with glue and along the cracks on both sides. Then, with the help of an intermediate plate and a hammer, the wedge-shaped inserts are nailed up as much as possible. After the glue dries, the excess inserts are cut off and the floor is ground.
 Sealing gaps with wood inserts Gaps can be blown out with mounting foam. Foam is needed with a small extension. Apply it in a small amount.After the end of the polymerization period, cut off the excess. You can put linoleum on top. For painting, this option is not too good, except that the top foam is covered with putty on wood. Otherwise, an inhomogeneous surface will appear, which will stand out under a layer of paint.
 You can also close the cracks with foam
A few words about how to close up cracks with wooden inserts. The slots have different sizes, so you have to do each wedge separately. It is long and dreary, and the inserts of different sizes do not decorate the floor too much. There is an option to make work easier and, at the same time, improve the look. Take the cutter and adjust all the cracks to the same size. If some are too wide, you can make two "calibers" or three. This is still better than cutting wedges under each slit.
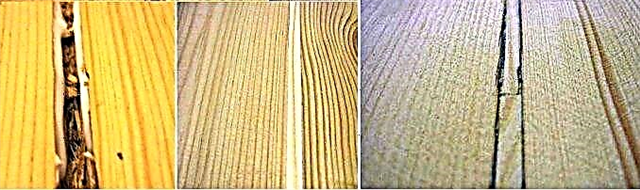 This is how the floor from the boards looks like before repair with and without wooden inserts
In addition to the pluses described above, with a milling cutter we remove old wood from the edges, expose the fibers. They will hold the insert better, since the wood fibers coated with glue will rise and join with the same fibers on the insert. After the glue has dried, tearing out this piece of wood from the groove will be very problematic. If everything is done correctly and thoroughly, the floor after polishing already looks good, and if it is soaked with stain and varnished (it can be matte, without gloss), it has a very decent look. The stain removes the difference in color, and the varnish hides flaws.
All these methods are more or less durable, but only if the boards do not bend. If the wooden floor bends, it will not work for a long time to close the cracks. The materials are likely to separate from the movement. So first you need to make sure that the boards do not "walk".
How to eliminate board deflection
If the boards noticeably “play” while walking, mistakes were made when laying the wooden floor. The lag step was chosen incorrectly or boards too thin were laid. So the solution is obvious:
- Set additional lags.
- Lay thicker boards.
 Change boards or lay lags more often - radically, but reliably
Both options require to begin to disassemble the old floor. This is far from always possible. Although, if there is such an opportunity, it is better to do so, but there is also a method without analyzing the floor.
Rip boards with dowels
To eliminate the deflection of the boards, you can turn the flooring into a single surface. To do this, dowels are inserted into the boards at an angle, which fasten two adjacent boards. Dowels are wooden rods. The hole for them is drilled so that it passes through two boards. The exact angle of inclination depends on the thickness of the flooring, so it is selected locally. The angle must be chosen so that the layer of wood above / below the dowel is not too thin.
Holes are drilled a little larger in diameter than dowels. Usually - 5 mm more. For example, under a dowel of 8 cm, a drill take 8.5 mm. Under the dowel 10 mm, drill 10.5 mm. Did you understand. Why is the hole larger? Dowels sit on glue. If they enter too tightly, they will squeeze it out. The strength of such a connection will be low. And so, the fibers from the glue swell, intertwined with the fibers of the dowel. When the adhesive polymerizes (PVA), the bond will become very strong. When trying to break it, the wood bursts nearby, and the connection itself is held.
 If the boards are loose, we first fasten them together
The drill must be very long - you have to drill not so thin boards at an angle. It’s hard to find. Alternatively, weld a bar of a suitable diameter. One more tip: make a template that allows you to easily maintain the desired slope. It’s difficult without him. Especially at the beginning. After several hundreds of holes, it will be possible to save a given angle without a template.
Then the inside hole and dowel are smeared with glue. For the holes, it will be necessary to fit a long glue nozzle on a regular bottle of glue (in such clerical PVA). Take a tube about 20 cm, sealed at the end. Holes are made in the sidewalls. Holes need to be made not too large so that when pressed, the glue splashes around. The technique is clear - a sprinkler is inserted into the hole, we click on the bottle, the glue gets on the walls.
 This is a wooden floor after rallying boards and sealing gaps
The dowel dipped in glue is installed in place. It is left so until the glue dries. Then the protruding part of the wooden chopik is cut, the cut is polished. The easiest way to cut off is a grinder, to grind - with what is. Manual grinding machine, plane or all the same grinder or drill at low speeds and with the appropriate nozzle.
How to close the gap between the floor and the wall
During repairs in the old housing stock, removing the old baseboards, we often find an unsightly picture. Between the wooden floor and the wall we have a solid distance, clogged with all kinds of garbage. Immediately comes the desire to close this gap. It is not worth closing it at all, since it is needed, but it can be reduced.
In general, a technological gap is left around the perimeter of the wooden floor. It should be from 1 cm to 4 cm in size. Depends on the size of the room. This gap is needed to compensate for board size changes. But if you leave immediately a large gap, over time, the wood dries out, the gap becomes too large. For dried wood, it is clearly superfluous. Moreover, modern skirting boards have a width of 2-2.5 cm, and the rest cannot be closed with them. Unless made to order. This is also an option, but you can go the other way.
 The gap between the wall and the floor can be significant.
The gap between the boards and the floor can be reduced with wood inserts. From a dry board of the same thickness that is laid on your floor. The insert can be put, but between it and the wall it is necessary to leave 1-1.5 cm.
If the edge of the floor is uneven, it will be necessary to file the boards, trim. There is a manual mill - it’s easier for you. No - with a hacksaw. After the edge is trimmed, measure what thickness of the insert you need. Do not forget that there should be 1-1.5 cm free space. We cut out the desired insert width from a dry board of suitable thickness. You can pin them to the beams on which the floor lies.
How to fill the technological gap
Technological clearance between the wooden floor and the wall must be mandatory. But emptiness will contribute to audibility, which is far from always pleasing. Alternatively, you can install foamed polyethylene or damping tape of suitable thickness (it is 10 mm and 8 mm). Polyfoam and polyurethane foam in this case, although much cheaper, but they will not help here. Wood constantly "walks", will compress the material, then let it go. Foamed polyethylene and damper tape are compressed under load, and after its removal are restored. Polyfoam and polypropylene once compressed, and remain. So there is no point in them.
 This way of filling the gap between the wall and the plank floor will not leave a void and allow the boards to move
You can use not a damper tape, but a special elastic cord made of foamed polyethylene and sealant. This solution is better in sound insulation. A cord made of foamed polyethylene is used to fill the damper (expansion joints). Its diameter is -1-1.5 cm. Choose which one you need. The cord should not be located near the surface itself, but a little lower - at a distance of about 1 centimeter from the edge of the board. Since the floorboard is usually at least 28 mm thick, a “stand” may be required. Expanded polystyrene can be used here. It will only support the cord. Cut into strips of the right size, lay in the gap. Above is a cord.
Sealant for wood is applied over the cord. When choosing a composition, pay attention that elasticity is maintained after drying. Sealant layer thickness - no more than gap width. Less is better. Otherwise, it will lose its elasticity. After application, it is necessary to form a surface either as in the figure — concave or convex. So the sealant retains elasticity longer and stretches / contracts better. This relief is formed by any seam suitable form. At least with a fingernail in a glove, at least with the handle of a spoon or fork.
Now you are aware of not only how and how to close the cracks in the wooden floor, but also how to eliminate the deflection of the boards, how to close the gap between the plank floor and the wall.