To build a bathhouse is not such a costly and difficult matter if you correctly create the necessary project, select materials and perform most of the work yourself.
The most suitable option for a simple bath 2.5x4.5 m is a profiled beam measuring 150x150 mm.
It is ideal for buildings in the middle climate zone. For the northern regions, a parameter of 180x180 mm is necessary, and in the south - 100x100 mm is enough.
Which beam is better to choose?
Most preferably profiled coniferous timber: spruce, pine, cedar.
The main thing is that the material should be dried well enough (otherwise it will take a lot of time for independent drying), have a minimum of cracks and deformations, and a special antiseptic impregnation against decay.
In terms of speed of construction and commissioning, glued timber also proved to be quite good. High-quality material does not produce any toxic emissions when heated. But quickly and simply mounted.
A bath from a bar 150x150 can be built in any area where the winter temperature does not fall below -300С.
From the inside, it is easy to insulate and equip at the discretion of the owners, smooth and even walls allow you to choose any type of decoration materials you like.
Necessary tools and materials
A bathhouse made of timber 150x150 with your own hands is ideal for an average climate! But one should not rush to the implementation of the project - it is very important to choose the right material in order to avoid problems in the future!
Spread a decent amount for the services of specialists or make a log house out of timber with your own hands - you decide! But even a superficial calculation of all expenses in case of independent work will surprise you - the savings in this case can equal the cost of all materials! What is no reason to get to work yourself. And from what to build a bathhouse, if not from a tree!
The advantages of the wooden structure are obvious - this is the minimum shrinkage upon completion of construction (if the tree is dry), and much lower cost compared to the same log structures, as well as a much simpler construction technology. Savings also occur on the foundation, which is made of tape or columnar, because the structure itself is not so heavy as in the construction of brick or stone. Of course, timber is far from being the most economical material in all regions, it is quite possible that after calculations you will find that a bath from cinder blocks will cost you less.
The foundation is the solid foundation of your bathhouse
Since wood is a fairly light material, a bathhouse on solid soils can also be placed on a columnar foundation. However, the most universal and reliable is still the strip foundation, which is applicable to any soil, and its arrangement is even within the reach of people far from construction. The only negative is the large labor costs, but nothing prevents you from inviting friends and relatives to help, who will be the first to bathe in your bathhouse!

When digging a trench, keep in mind that it should be no less than 20 cm deeper than the freezing layer, with a total depth of 70 to 80 cm.
The width of the foundation should be greater than the size of the beams by no less than 10 cm, and it should be no less than 15-20 cm above the future blind area. The foundation is made according to traditional technology - first a sandy layer is laid that eliminates the seasonal movement of soil under the base of the house. Poured sand is watered and, after precipitation, is also compacted. On top of it, you can lay concrete blocks or pour it with concrete mortar.

For the blocks you will need additional equipment, which, moreover, can not always drive up to the right place. Therefore, it is easiest to put the formwork, lay the walls with roofing material so that it does not leak anywhere, and pour the mixture. When pouring, reinforcement bars are installed, to which the first row of bars will be attached. Do not forget to lay burlap or a layer of sawdust on top, so you can easily maintain the desired humidity.
Self-construction of a bath from a bar
To build a bathhouse out of timber with your own hands is not the easiest thing. But there is nothing impossible for a person who has a desire. In this matter, it is important to draw up a detailed work plan, an accurate diagram and choose durable building material.

For the construction of the bath, a strip foundation is most suitable. First you need to make a trench. Its perimeter should be slightly larger than the future building. Next, you need to lay out a sand and gravel pillow and a reinforcing mesh. In conclusion, you should install the formwork and pour concrete.

The height of the foundation should be calculated depending on the degree of freezing of the soil. The optimal size is 0.7-1 m. The foundation freezes within 4 weeks. After the foundation has completely hardened, it is necessary to cover it with waterproofing material.

It is necessary to put on the surface of the base, first bitumen, and then roofing material. The operation is done twice. It is important to wait for the bitumen to harden.


For laying the first crown it is necessary to use wooden slats with a thickness of 150 mm. Before putting them on the foundation, it is necessary to treat the slats with an antiseptic. The distance between them must be at least 300 mm. Reiki is needed to prevent the process of decay. The first crown is laid on them.
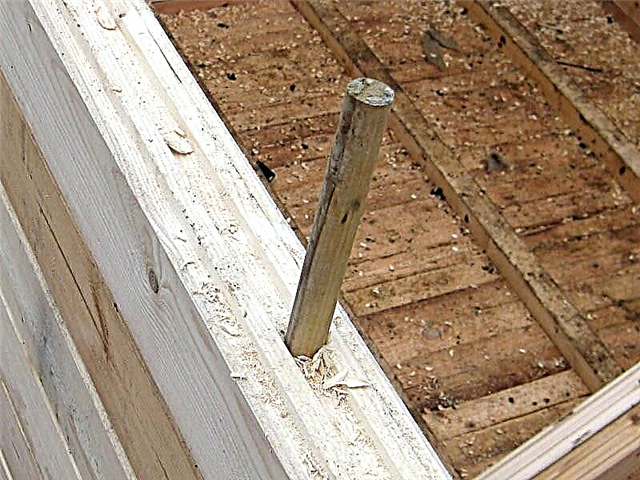
During the construction of the walls it is very important to use the level. The first crown must be covered with insulating material. The second crown must be fixed with wooden pins.
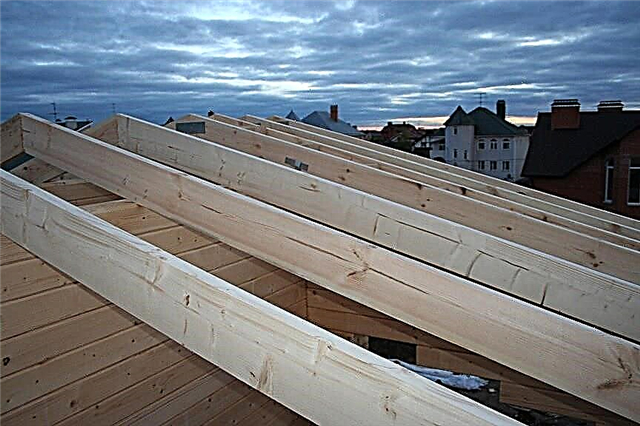
Only after complete shrinkage of the wood can you start building the roof. This is one of the most difficult stages in construction. First you need to put the building beams. Next, attach the building legs to them. If the design of the bath includes a roof made of sheet material, then a frame is needed.
It is worth thinking about protecting the roof from external factors. In this case, galvanized iron will help. In conclusion, it is necessary to sew up the fronts of the roof. This can be done using siding or a wooden board.
Here are the main stages of building a standard bath.

Many, wondering how to make a bath, consider that for this purpose it is necessary to call a team of builders. But in fact, even for a person without experience, building a bath will not be difficult, and he can cope with the construction on his own.


If it is difficult for a beginner builder to imagine what the future construction should look like, then a photo of the bath from the beam can be found on numerous sites or in magazines, the main theme of which is to conduct construction work. It is also necessary to draw up a plan and drawing.
Is glued beam eco-friendly?
The lamels are completely made of wood and it is impossible to doubt their environmental friendliness. But the glue that is used in the construction of a glued beam bath is quite toxic. From an environmental point of view, this building material is not recommended for use. Although there are adhesive compounds that are considered less harmful. These include EPI.

But still, most manufacturers prefer to use a polyurethane composition, which is famous for its harmful substances. And they use this adhesive more often, because it is one of the cheapest.

Thus, we can conclude that building a bath from this material is not a good solution. This is due to the fact that the walls in such a structure will not breathe. There is also the possibility of poisoning with harmful substances that glue releases during heating.


Profiled beam, as a material for the construction of the bath
Profiled timber is considered one of the most environmentally friendly building materials. It began to be used in construction more than 15 years ago, this technology came to Russia from the Finns.

A bath from a profiled beam has both its pros and cons. The positive aspects include ease of assembly. Indeed, using this technology, you can assemble a bathhouse, like a children's designer.


Also in such a bathhouse good thermal insulation. This is due to castle connections. Another plus is the regular geometric shape.
The disadvantages of this design include natural humidity. Cracking of walls and distortion of the structure is possible.

It is better to take building material in the winter, as it has humidity, which is similar to chamber drying.

Additional annexes to the bath
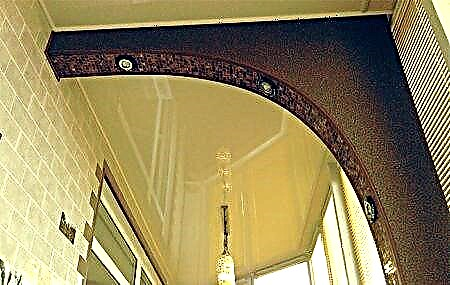
Very often, especially in the hot summer period, I want to get out of the steam room and plunge into the atmosphere of peace and comfort, in the fresh air. In order to prevent bad weather from spoiling the rest, it is recommended to erect a terrace.


A bathhouse with a terrace is a dream of many people, which can easily be realized by building a terrace between the bathhouse and a residential building. The plus of this idea is that you don’t have to look for a place to cook or wait for the rain to end.

But it is worth considering that it would be better to erect an extension so that it abuts against a blank wall of the house. This is necessary so that smoke from the chimney does not fall into the windows of the home.


In conclusion, I want to say that it is very important, before you start building a bath, to calculate the budget. If a person is not sure that he will have enough money to complete the construction, then it is better not to take up this matter. On the other hand, a compromise can be found. It lies in the fact that there are budget options for baths.

To choose a structure that would suit all parameters, you need to familiarize yourself with many options.
Photos of ready-made baths can be found on the Internet or in reference books and magazines on construction. If you decide to build your own bath for the first time, it is recommended to choose the option as simple as possible. Do not swipe at buildings with intricate drawings. Not everyone can immediately understand all the subtleties.


Own bathhouse is a dream of many people, but not everyone can decide on its construction. The bathhouse brings comfort and harmony to a person’s life. It allows you to temporarily let go of all important matters and take care of your health.

People who lived several centuries ago considered the bath a cure for all diseases. It is proved that the bathing effect has a very positive effect on human immunity.
Project creation
The first step in construction is design. A decision must be made related to the design features of the bath. This can be a simple one-story project or a house with an attic, or a bathhouse can be equipped together with a cozy veranda. Pay attention to the choice of timber, as it can be profiled, planed or glued.
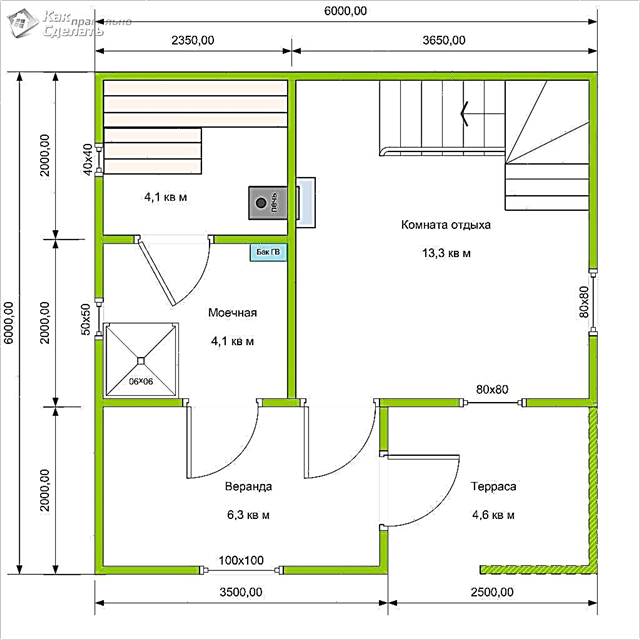
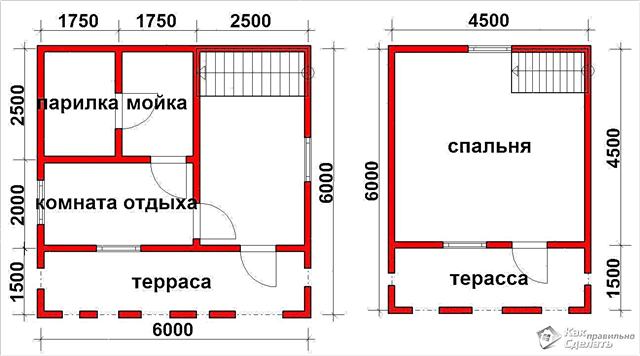
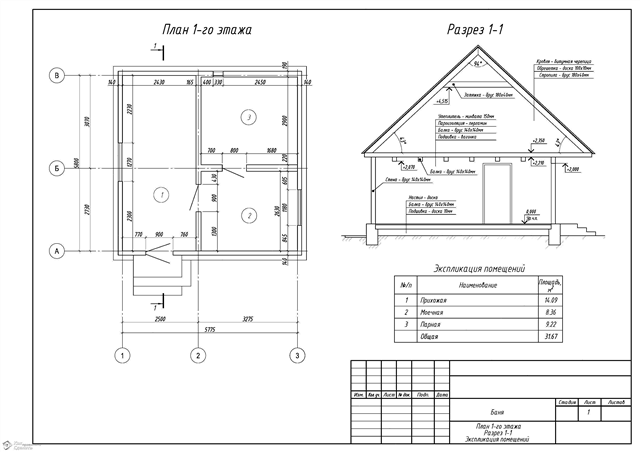
 The plan of the bath with an attic
In the design process, it is determined how many rooms will be in the building, and what should be their size. The main indicator of the durability of the bath is a quality foundation. Therefore, even at the design stage, it is necessary to create a design foundation scheme.
Russian bath consists of a steam room, dressing room and vestibule.
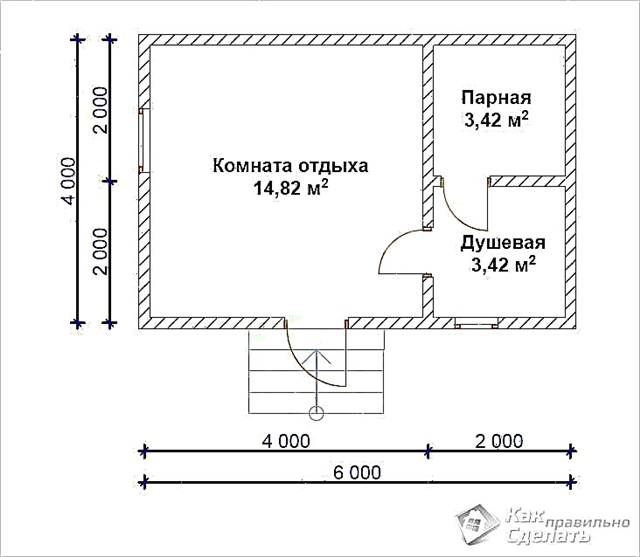
 One-floor bath plan
For each person in the steam room should be provided about 4 m 2.
It is also worth determining the location of the furnace. Its foundation must be laid simultaneously with the main foundation.
Do-it-yourself sauna bath construction - we build walls
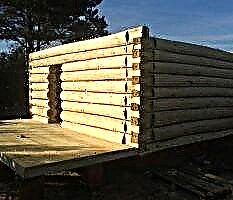
After two weeks, or better, and only a month of drying the foundation, you can proceed with the installation of the so-called strapping crown. Use the strongest and strongest bars for it, it is better if they are thicker than the rest, for example, 200x200. It is recommended to exclude contact of wood to the foundation in order to protect the boards from rotting, for example, to lay the same roofing material.
The lower beam should be pre-treated with an antiseptic, some masters are treated with machine oil. The construction of the bath is possible according to different scenarios - and nailed the bars, and cutting grooves. It is better not to use nails with a fresh tree - when dried, they do not allow the bars to settle, resulting in cracks. Grooves are considered the most reliable adhesion method.

Finishing stage - we will crack the cracks!
When the bars are laid, get ready for a sufficiently long wait - on the shrinkage of the frame, on average, it will take up to six months. Therefore, lay strong boards on top of it, on top of which spread a thick film or slate ... The main thing is that the tree does not get wet, but at the same time it is important to ensure good ventilation. When the structure has stood for sufficient time, you should proceed to caulking - sealing all the cracks. To do this, there are both proven heaters such as moss, tow or felt, and modern sealant designed specifically for these purposes.
The use of sealant significantly speeds up and simplifies the work, however, you decide which method to use. Usually they start to caulk from the lower crown, gradually moving upwards - it is important not to overdo it so that the bars themselves do not move! With a ready-made frame, things will go faster - the construction of a bathhouse from a beam with your own hands has just begun! The next step is the warming of the bath (warm floor and ceiling), ventilation system, installation of a heating system, but these are separate topics for conversation.
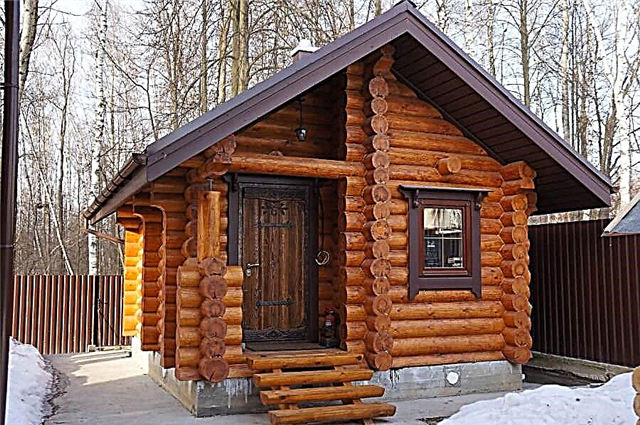
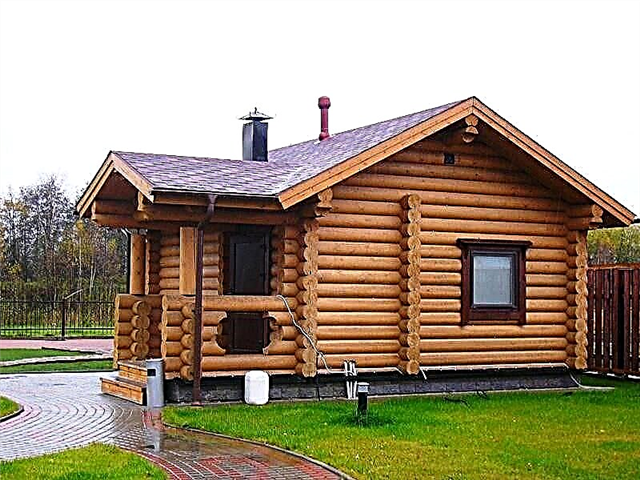
150x150 timber bathhouse: beautiful building options
It is difficult to argue with the fact that a bath in a suburban area for a Russian person is a necessary subject. It is needed for the adoption of water procedures, water heating, in addition, it is used for relaxation and spa treatments.
A wooden beam of 150 x 150 size for this building will be an ideal option for combining price, quality and time for construction.

Features
A tree is an ideal option for building a bath, since it is in such a design that you can create ideal conditions for temperature and humidity, the effect of a Russian steam room.
There are several more reasons that make wooden beams a favorite among other materials:
- Wood has low thermal conductivity. The correct choice of the cross section of a wooden beam allows you to heat the room in the shortest possible time, while it will cool for a long time. For northern latitudes, do not use a beam with a section below 200 mm, for central Russia, a section of 150 x 150 will be sufficient, and for the southern districts you can build from bars with dimensions of 100 x 100.
- For the manufacture of timber, coniferous trees that have anti-allergenic and antibacterial effects are more often used.
- For a small one-story sauna from a beam, you do not need a massive foundation, as, for example, for a brick or stone building.
- A beam shrinks several times less than a log. Also, it is not subject to warping, deformation, cracking.
- It is quite convenient to work with a beam, unlike a rounded log. Wooden buildings practically do not require interior decoration.
- The beam is usually already treated with biological and fire-retardant impregnations, which means that the construction of such raw materials will not rot, will not be eaten by insects, the risk of fire is minimal.
The size of the bath depends on several conditions:
- plot area. The summer cottages of the majority of the inhabitants of our country are 6 hundred parts, which means it’s logical to build a small bathhouse on such land,
- construction budget
- personal preferences of future owners.
The creation of individual projects of wooden buildings, including baths, is carried out by special construction companies or design offices.Many such companies also offer turnkey construction, which includes all stages from project development to the construction of the building and the organization of all utilities.

If you decide to order in the company only plans and drawings, and the construction will be carried out on your own, refer in detail to the composition of the design documentation. In the finished version, there must be a sketch and a working draft.
The first provides the following data:
- foundation plan
- explanatory note with all technical indicators,
- building facades
- floor plans
- sectional room
- floor and ceiling floor plans,
- rafter system (general view and section),
- volumetric layout or visualization in volume on a computer,
- explication of all rooms.
How to build a beam bath
A bathhouse in a country house or on a plot of a country house is no longer a dream, but a necessity. Owners of private homebuildings are developing a construction project so that it includes all the necessary buildings - a garage, a barn, a bathhouse, a pavilion. Therefore, the construction of a bath of timber in recent years is rapidly developing and popularizing. But since the land plots are mostly small, the owners choose smaller bath projects, for example, a 100 x 100 bath (beam section) 3 x 3 m in size with a ceiling height of 2 m. Even in such a small building, a steam room and a shower room will fit , and a rest room. All operations must be regulated by SNiP 31-02-2001. In larger projects, a bathhouse is built from a beam of 150 x 150 with additional rooms that improve the comfort and functionality of using the building.
You will need
It is also necessary to pre-prepare insulation, nails, electrical wiring and its components, self-tapping screws of different lengths and diameters, corners for assembling the roof structure, fittings, plastic or wooden windows and entrance doors, as well as internal doors. In addition, if you plan to connect the water supply to the bathhouse, then you need to think about the organization of sewage. For our project, bath houses made of timber with their own hands, water supply and sewerage were not developed.
How to lay the beam and raise the walls of the bath:
Procurement of building materials, cost and estimate:
We build a timber bath on our own - steps from the foundation to roofing:
Any construction of a bath from a bar can be divided into specific stages:
- Foundation pouring.
- The construction of a timber frame.
- Installation of rafters and roofs.
- Flooring plank floors.
- Installation of windows and doors.
- Laying electrical wiring, installing fixtures and installing other electrical equipment.
- Decoration of internal walls, finishing work on external walls.
Stage 1. Foundation filling
The best option to build a sauna from a bar with your own hands is a concrete base. 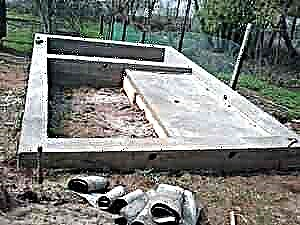 Base fill
Tool you need
- Trench tool.
- Wooden stakes or fittings, cord, tape measure, level.
- Building material for the assembly of formwork.
- Reinforcing bars and knitting wire for concrete reinforcement.
- Factory concrete or concrete mixer, shovel, mortar tank, cement, crushed stone, water, sand.
- Waterproofing materials.
The site should be leveled and the perimeter of the foundation marked with pegs and a cord. If we build a bathhouse of small timber, then the foundation will be shallow, and a trench for it can be dug with a shovel. The depth of the trench is up to 50 cm.
Next, the formwork is mounted, the armature frame is knitted, concrete is prepared according to the standard recipe, the solution is poured into the formwork. At the time of the mixture hardening (about 2 weeks), the foundation is covered with roofing material.
Stage 2. Tying and walls of a timber bath
Column base for the furnace
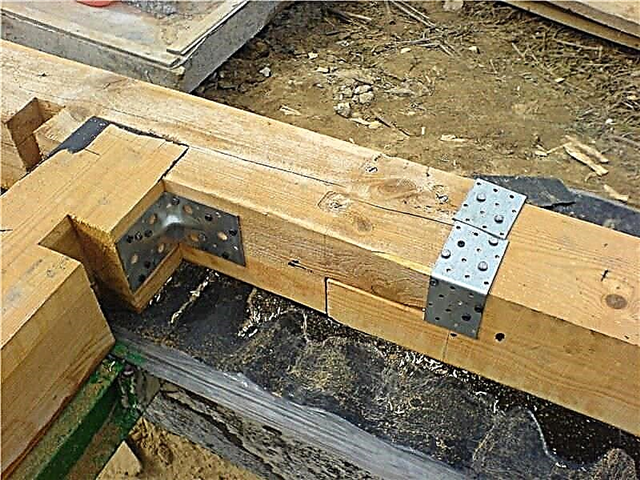
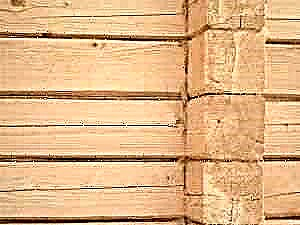
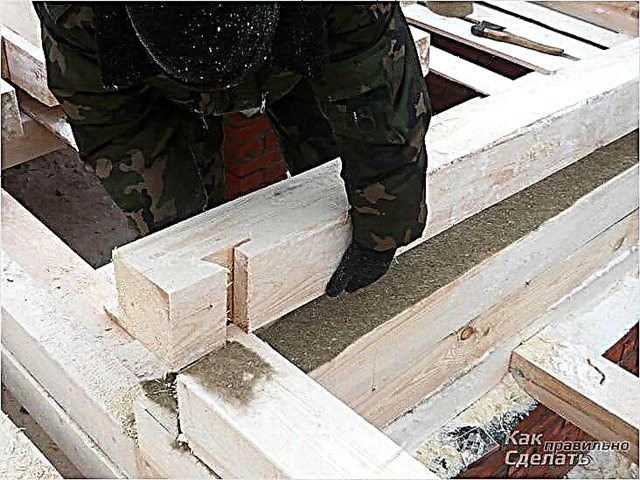
The bars will be connected like this: the ends - in half a tree, the corners - in the paw.
- It is recommended to soak the first two rows of bars with antiseptics and flame retardants, and then lay them on a roofing material laid in two or three layers. The lower beam should have a marking under the windows and doors of the bath not yet built. Corner joints of the timber are additionally fastened, it is possible with pins or corners. When building a bath 3 x 3 m intermediate pins are not needed.
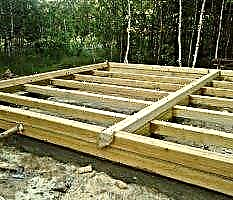
- Next, floor beams are laid for flooring. The distance between the beams is 1.3-1.5 m.
- The cracks between the beams are insulated with tow, linen, jute or more modern thermal insulation materials, for example, tape.
- If nevertheless there is a need to install intermediate dowels, then they are fixed after 1 m. The dowels can be wooden or metal. At the corners of the windows and doors, the pins are mounted at a distance of 0.2 m from the edge of the opening.
- After a set of walls, a ceiling is mounted. The beams for it are mounted in two rows from the top edge of the wall, the approximate ceiling height that the bathhouse will have from the beam with its own hands is 2 m. The beams must be sawn into half a tree, for our small bathhouse, there will be enough two boards for the ceiling.
- The remaining two rows of wall timber are laid on the ceiling beams. These two rows should be fixed especially firmly, since the last beam will serve as a Mauerlat in the rafter system.
- Before arranging the roof, you need to make at least a temporary ceiling - it can be covered with any boards, since at the end of roofing they will be removed and a permanent ceiling will be arranged.
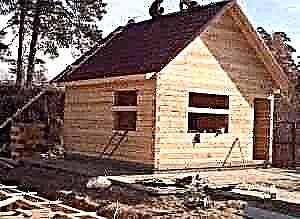
The main problem when a bathhouse is being built from a timber with its own hands is to bring the skeleton of the bathhouse under the roof so that the rest of the work can be carried out not in the rain and wind, but in a sheltered room.
Stage 3. Roof
Arrangement schemes are available for single or gable roofs. If we build a sauna from a beam with our own hands of small sizes (three by three meters), then the single-sloping sloping roof option is better. 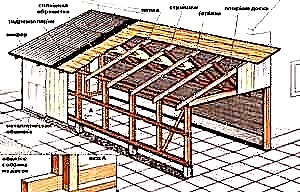 Shed roof construction in the bathhouse
Under a pitched roof, the ceiling is immediately made permanent, it is insulated with foam. The characteristics of the heat insulator are shown in the table below:
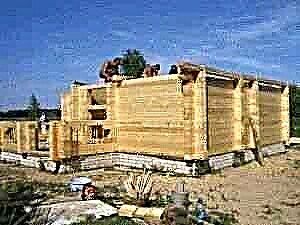
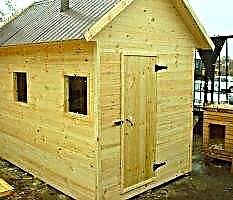
The construction of a simple one-story bath
The first stage: creating a project, calculating and purchasing the necessary materials.
First, laying of the tape inlet or column foundation with dimensions of 4100x4100x300 mm and the formation of the base under the furnace is carried out. Still preferable is a tape model.
The process is time-consuming, so if you build a bath with your own hands you need a couple of assistants. After the solution dries, you can proceed to the construction of walls.
A ball of waterproofing from roofing material is laid between the first tier of the beam and the foundation. A wreath is installed, for which the strongest bars with dimensions of 200x200 mm are selected. They are pre-treated with antiseptics.
Mounting methods - nails or grooves. If the wood is fresh, it is better not to use nails, during drying they will not give good shrinkage, as a result, cracks will appear. Dovetail grooves are a more reliable coupling method. Also, with the help of bars 100x100 mm, interior partitions are erected between the locker room, washing room and steam room.
Next, you need to provide moisture protection, good ventilation and wait until the frame shrinks completely. It may take 5-7 months.
After proceeding to close up the cracks. Use moss, tow, felt or special sealants. Start work from the lower tier and move up.
The stove is laid out of brick with a firebox located on the side of the dressing room.
Spend drain sewage. A layer of waterproofing, foam sheets, another layer of waterproofing are placed on the floor, a concrete screed and tile lining are made. In the washing and steam rooms they make a type-setting floor from cut boards, leaving gaps so that water drains from the premises.
For the ceiling, tongue-and-groove boards of 40 mm are used, plasterboard or lining. The roof is made of corrugated lining.
It is recommended to use larch as a decorative material in the washing and steam rooms. It is quite heat and water resistant.
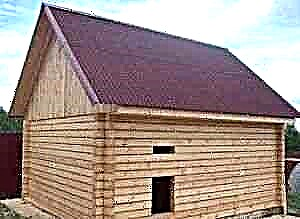
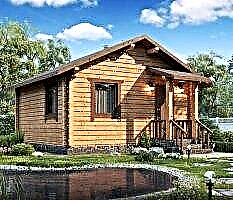
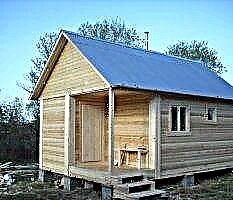
Projects of building a bath from a beam of 150x150 mm in the photo below.
What kind of wood is better to build a sauna from?
The durability of the bath will depend on the quality of the beam. You should pay attention not only to the quality of the wood itself, but also to the period of the year when it is harvested. The beam used in the construction process must be procured in winter. Then the tree is laid so that it has a period of tracking. Its duration is 1 month. Only then can the material be processed in accordance with all requirements.
For the bath, you should use a beam that does not even have microcracks. The thing is that in the process of shrinkage of the log house, they can be the cause of the decay of the wood. Building material with bluish spots and a wormhole cannot be used to build a bathhouse.
The breed of wood also plays an important role.
The lower row is recommended to be laid out from larch, and the remaining rows can be replaced with a bar from any coniferous species. This is explained simply: larch does not rot. Over the years, it only improves its characteristics, becoming stronger and harder.
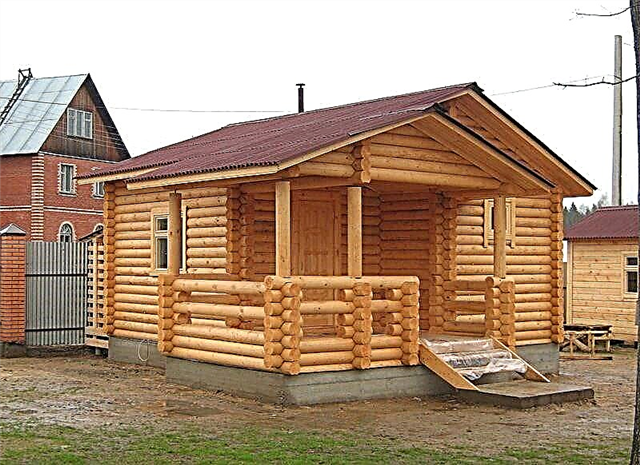
Other types of baths, features of their construction
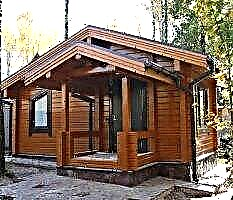
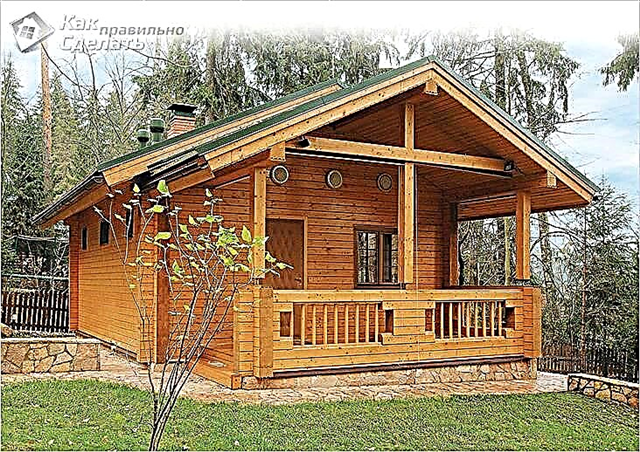
The bath can be made simple, without additional structural solutions. But if the budget and the size of the construction site allow, a veranda, gazebo or terrace will be a great addition.
The peculiarity of the construction of such a bath is to obtain a comfortable place to relax in the fresh air, and if you install a barbecue, then also for cooking barbecue.
If the extension is supposed to be used in cold weather, it is enough to glaze it.
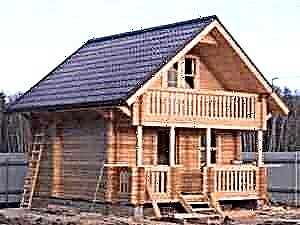
You can also build a two-story bath with an attic, ergonomically using the attic space for storing bath accessories (brooms, ladles, etc.).
The construction of a full-fledged two-story bath will cost a lot: a strong foundation and a beam of 240x240 mm are required. But on the second floor there will be a great billiard room, an additional lounge, a bar.
Since the baths have high rates of hydro and thermal insulation, it is easy to convert the room into a living room in warm weather.
Laying the foundation for the bath - the main options, construction technology
 Block column foundation
Stages of the construction of the foundation:
- For the manufacture of the column foundation, columns should first be set around the perimeter and corners. The distance between them should be about 2 m. It is usually made of brick. Under each pillar, it is necessary to pour a pillow of concrete.
- To equip the strip foundation, pour concrete along the perimeter of the future structure, in accordance with the indicators of soil freezing. The depth of the pit can vary from 55 to 70 cm. The foundation should also be insulated from all sides.
Whatever type of foundation you choose, you should floor two layers of waterproofing material. In this role, roofing material may be. The part of the foundation that protrudes above the blind area should be at least 15 cm, and the width should exceed the width of the beam by 10 cm. When pouring the foundation, one should not forget about mortgages from reinforcement. This is necessary for the subsequent fastening of the foundation with the first salary.
Bookmark crowns bookmark - highlights
When assembling the bath you should have no difficulties, even if the design is completely improvised. The secret to success lies in the accuracy of the work. Do not rush to finally fix the crowns. Pre-check the horizontal evenness of the beam. For this you need to use a level.
The weight of the walls and the roof will fall on the first row of bars, so they should be the thickest, in comparison with the subsequent ones. The recommended section of the first row of bars is 20 × 20 cm. Subsequent may be 15 × 15 cm. Their length should be completely identical.
Laying the first salary of the log house begins with the placement of thin slats of wood on the base. Previously, they should all be treated with an antiseptic. Their thickness is about 1.5 cm, and the distance can range from 25 to 30 cm. Carrying out this event protects the bars from decay and moisture. So, the life of your building will increase. The inter-rack space should be filled with either insulation or mounting foam.
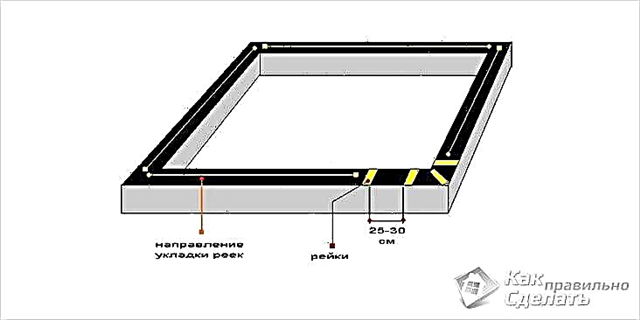 Laying the beams of the first crown
The beam should not be laid too tightly, because over time the bath will give the necessary shrinkage. For processing the first row, you can use machine oil or a modern antiseptic drug.
Walling Methods
 Log house assembly
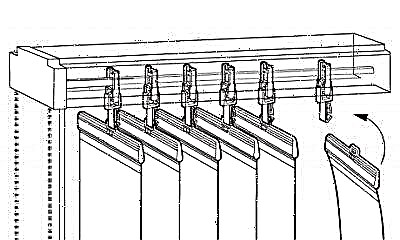
When constructing walls, first place the crowns that should be aligned, and then fasten with nails or pins made of metal. Pre-drill holes for them with a diameter that perfectly matches the diameter of the mounting pins. The distance between the fasteners should be 1.5 m. The hole should pass through the beam located on top and capture half that is lower. Drive a hole in the hole with a length equal to the height of two bars. Now lay the insulation. Put the top layer back in place.
In this way, all the crowns should be laid, with the exception of the last two upper ones. The latter should not be fastened. At the end of construction, they will need to be temporarily removed to install the ceiling beams.
The fastening of the beam can be carried out in another way, for example, using drowned nails - without hats. This process cannot be performed with ordinary nails, because over time they spoil the wood with rust.
 Pin mount
Wooden dowels can also serve as elements of fastening the beam, their cross-section should be 18 × 18 mm. The length largely depends on the size of the beam, but should not exceed 25 cm. Pre-drill holes in the boards, equal to a diameter of 21 mm, and then drive dowels in them. They must be staggered. Drill a timber through and through.
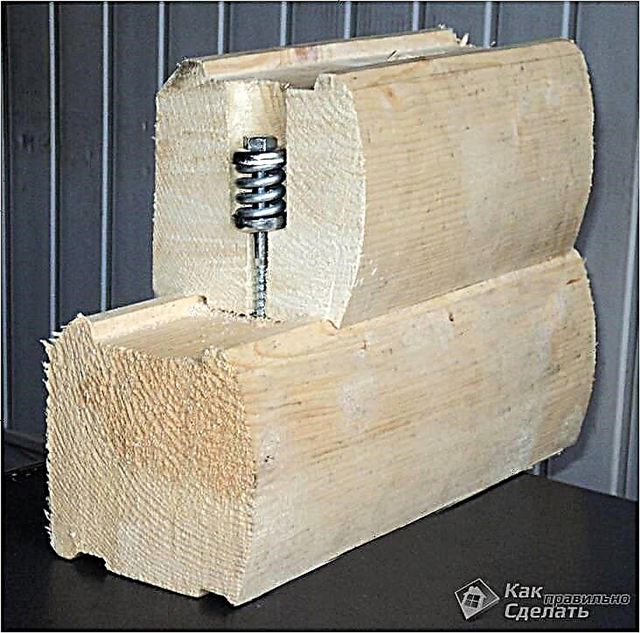 Clamping unit
In order to avoid the slightest deformation and the formation of cracks in the uneven bars, use the Strength spring unit as a fastener for wall structural elements. It looks like a screw with a compression spring built inside. The fastening system does not allow the appearance of gaps due to the strong pressing of the boards one to the other.
 Spring assembly
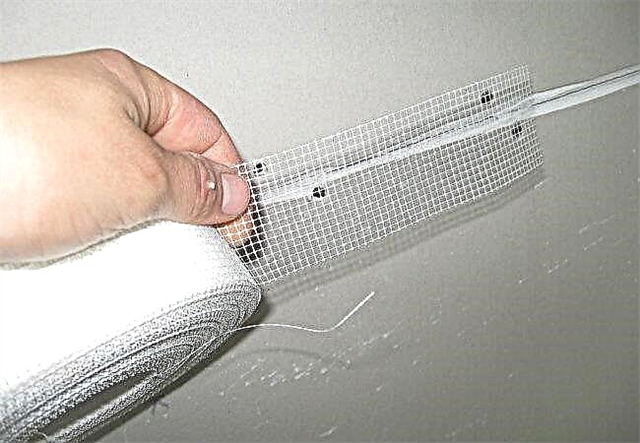
As an interventional insulation, jute, tow or moss can act. These materials do a good job of their thermal insulation tasks.
Due to the fact that the jute is unwound gradually during installation, it is convenient to work with it. It is easy to fix it to the bars, for this you can use a stapler or nails.
 Jute insulation
When warming the interventional space with jute, there is no need to caulk (clog the slots in the walls of the bathhouse with heat insulation) to shrink the structure. However, if the bathhouse was insulated with moss or tow, then all the cracks formed would have to be caulked. For this, a caulking gun, a hammer and a wooden spatula are used.
Openings for windows and doors
 Making a window opening
You can start installing window and door frames either during the construction of walls or after completion of construction. Leave gaps between the bars in those places where there will subsequently be window and doorways. When the walls are ready, you can saw through the opening of the required size. For this you need a chainsaw.
Installation of boxes during the construction of walls can be risky, as over time the wooden structure will shrink.
 Casing diagram
Now you should prepare the walls for a shrink period. On top of the last crowns of the walls, lay a series of boards having a thickness of up to 5.5 cm. Then cover them with roofing material or slate. So, the bath should be left for six months.
Which of the following tips do you find important? Maybe you are ready to share your experience? Then write comments on the article.
Video: building a bath from a bar from scratch
 Construction of a bath from a bar
 Bath 100 × 150
 Bath 100 × 150 with a veranda
 A tiny log bath
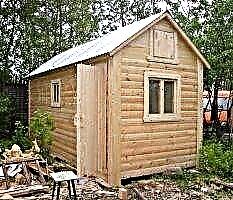
 Small bath
 A small bath of timber on screw piles
 Big bath
Blueprints
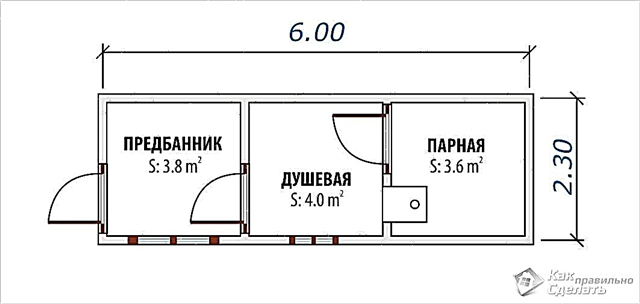 Bath 6 × 2,3
 4 × 4 bath project from timber
 Bath 4 × 4
 Of planed timber 4 × 4
 Bathhouse of timber 5.5 × 4 m
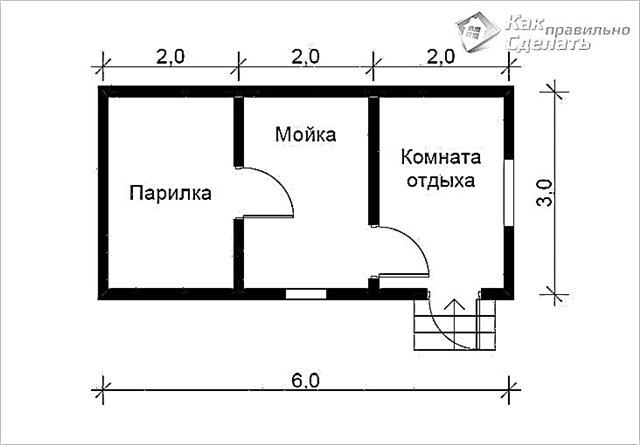 6 × 3 project
 4 × 6 plan
 The project of a bath from a bar 4 × 6
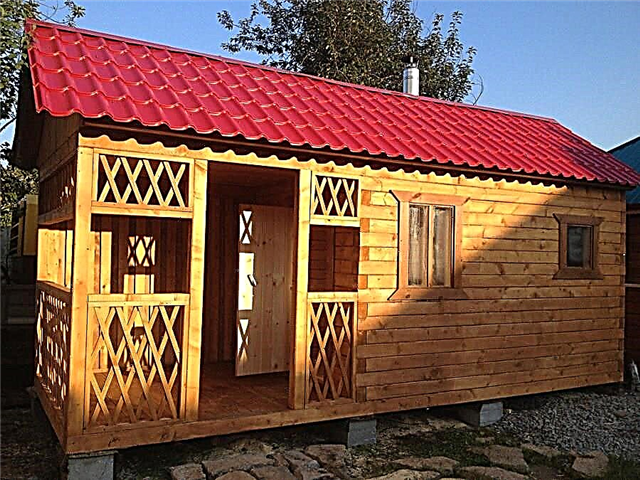
 6 × 4 bathhouse with terrace
 4×6
4×6
 Bath 6 × 4
 6×6
6×6
 6 × 6 planed timber with terrace
 8,53×7,51
 4 × 9 bathhouse with terrace
 Option of a two-story bath from a bar
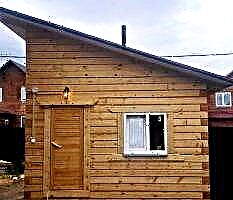
 Mobile bath 5.3 × 2.2 from prof. timber with an entrance from the end
 Another example is 5.6 × 2.2 from prof. timber
 Logging options 5 × 3
 Attic plan
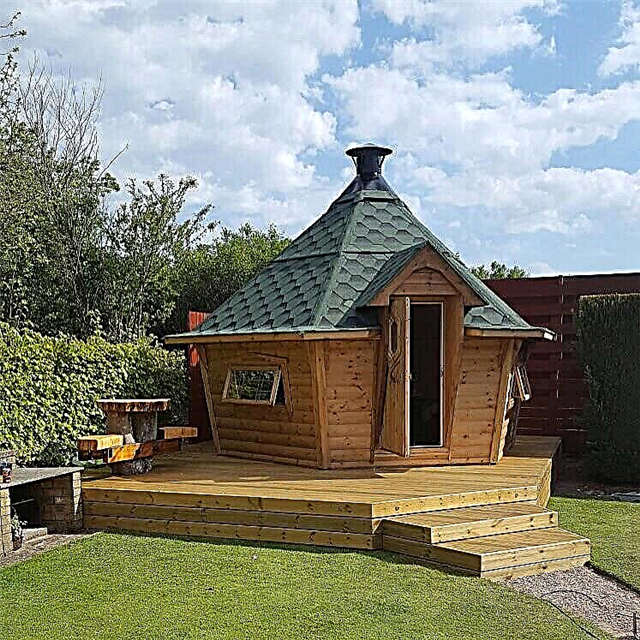
 Guest house bath
 Layout 6 × 3 with residential attic
 7 × 6 project with veranda
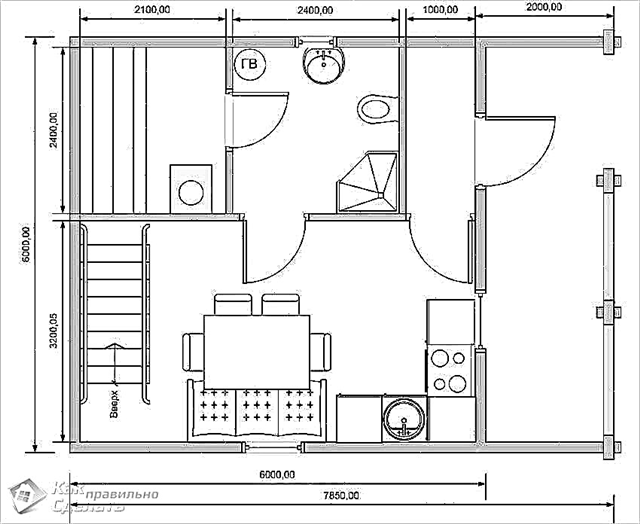 Layout project of the first floor of a two-story bathhouse made of timber
 Drawing of a bath from a bar
 Another drawing
 Finished project
Video instruction
How to lay the beam and raise the walls of the bath:
Procurement of building materials, cost and estimate:
We build a timber bath on our own - steps from the foundation to roofing:
Any construction of a bath from a bar can be divided into specific stages:
- Foundation pouring.
- The construction of a timber frame.
- Installation of rafters and roofs.
- Flooring plank floors.
- Installation of windows and doors.
- Laying electrical wiring, installing fixtures and installing other electrical equipment.
- Decoration of internal walls, finishing work on external walls.
Stage 4. Flooring
If you use bathhouse projects from profiled timber, floor logs can not be mounted. Beams are laid in increments of 1 m, and edged boards 30–40 mm thick are laid on them. It is recommended to make a bias on the floor in the direction of water flow at 2-3 0. Sewerage can not be equipped, as:
- A shallow foundation allows drains to quickly absorb into the ground.
- A small log house made of timber with your own hands is the minimum flow rate.
 The scheme of flooring in the bath
Video instruction
How to put boards on the floor of the bath:
Stage 5. Wiring
- After calculating the total power of all electrical appliances, you need to add a margin of 2-3 kW.
- The electric cable is divided into categories according to the cross section of the cores. For example, 0.5 mm 2 can withstand ≈ 2.5 kW load. It is better to buy proven licensed products, since a fake can have a large spread in terms of power and cross-section. For complete peace of mind, it is better to buy a cable with a margin of these parameters, for example, with a cross section not of 0.75 mm 2, but 1 mm 2.
- It is imperative to equip the general grounding - increased humidity and high temperature pose a danger to the operation of the bath. Grounding is done quickly and easily: you need to drive a steel rod with a diameter of 16-20 mm into the ground, an immersion depth of 1 m. A bolt is welded onto the rod, and an earth cable is connected to it.
- All electrical cables in the bath must be protected by a metal casing - corrugated or solid. The casing will help to avoid fire, and will also serve as protection against rodents.
- Before laying the cable, arrange for yourself a small allowance in the form of a diagram or a plan for the location of outlets, lighting devices, other electrical equipment.
- After that, markings are drawn on the walls, holes for fastenings are drilled, wiring is mounted.
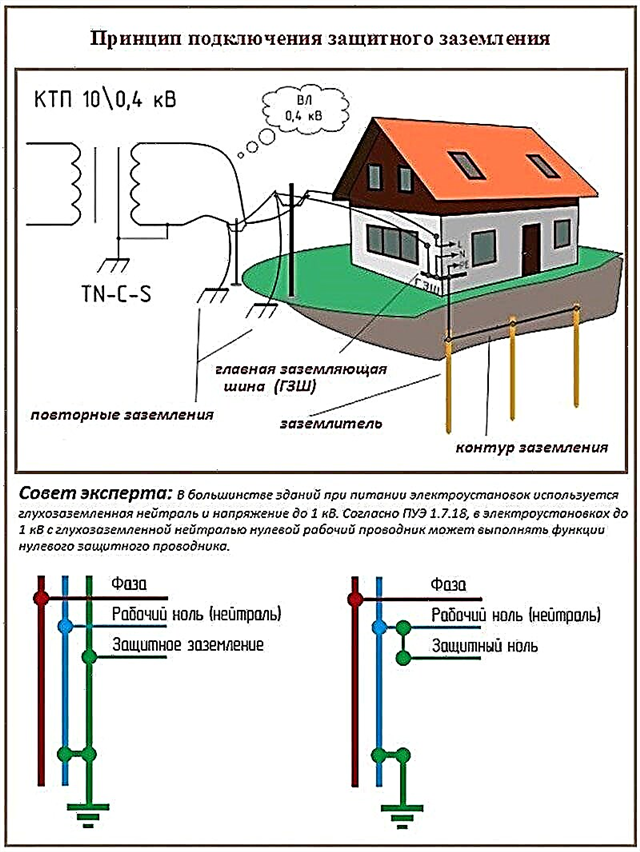 Safety ground
 Video instruction
Self-wiring in the bath:
Step 6. Read more about windows and doors.
It is not easy to make the doors and windows for the bath yourself - you will need a woodworking machine, experience on it, drawings of structures with exact dimensions. It is easier to purchase factory products, and PVC windows will also be appropriate in the bathhouse. Doors can be wooden, MDF or PVC. Structural Installation Steps:
- Both door and window openings are aligned - filed, planed, etc.
- Before installing the products, it is necessary to assemble special board boxes for them - you need 5 x 15 cm boards. Frames on nails are assembled, inserting it into the opening, you need to leave a gap of 30-40 mm from above - the log house can begin to sit down.
- In doorways or windows, plank boxes are also mounted on nails or on self-tapping screws. The upper slit is insulated with mounting foam or traditional thermal insulation materials.
Video instruction
How to install windows in a wooden bathhouse:
 Installation of plastic windows
Step 7. Set the frame and securing the lining strips
For decorating the walls of a twin room and a shower room, a lining is traditionally used. For the recreation room it is allowed to work with any building materials - plywood, OSB, fiberboard, particleboard, plastic or MDF. It’s more difficult to work with the lining, so we will consider this step in more detail:
- For the supporting frame, you need rails with a cross section of 20 x 50 mm.
- First, the extreme rails are attached to the wall, a cord is pulled between them, the frame rails are fastened along it with a pitch of 400-500 mm.
- The difference in height between the ceiling and the floor surface in the corners of the bath is removed. The discrepancies are leveled by fitting lining strips from below and above. Between the stripes of the lining and the floor, ceiling, it is necessary to leave gaps of 10-20 mm in size. Subsequently, the gaps will close the skirting board. The ceiling plinths should be attached to the lining, and not to the ceiling boards, otherwise, when the bath shrinks, the lining may distort.
- For the installation of strips, nails 150 mm long are suitable, they are driven into the grooves of the strips.
 Frame diagram for a set of lining strips
For outdoor decoration, any building materials are suitable. If you are building a cheap and small bathhouse, then it does not make sense to use expensive casing. Window and door openings, as well as openings of internal doors must be closed with platbands. The presence on the market of cheap and beautiful materials allows you to choose any finish.
Video instruction
Internal thermal insulation of the bath, interior decoration and wall protection: