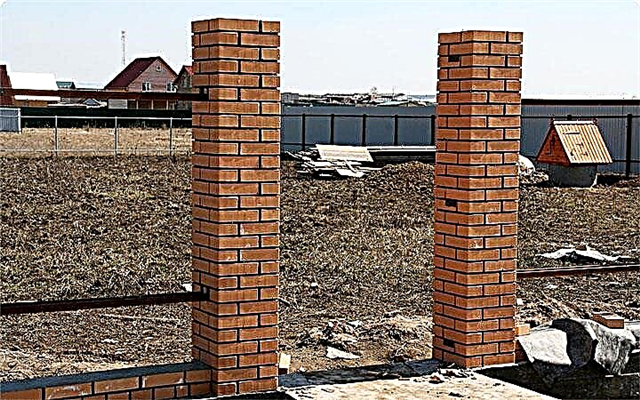
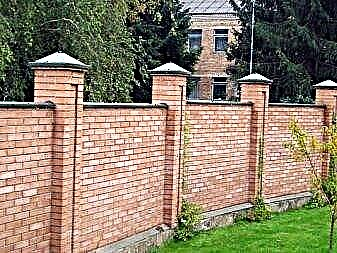
When installing fencing in the private sector, the main design requirements are protection and durability. If you use a brick, you can achieve additional rigidity by strengthening the structure.

A fence with brick pillars is a good option for a fence with reliable supports. Observing step-by-step guidance from the masters, it will turn out to be built independently.
Users often search for:
We determine the type of construction
Begin work with a thorough drawing up. On the diagram you need to display:
- soil type
- view, height of the foundation,
- the height of the posts
- location, area of the fence on the site,
- sizes of gates, gates,
- step between supports
- material for filling openings,
- communications that can take place under the fence.
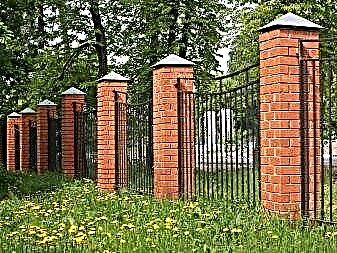
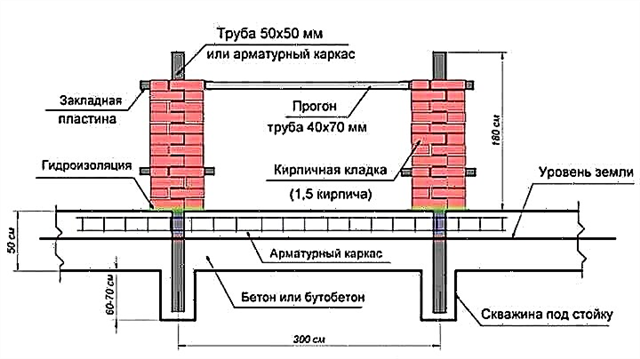 Fence scheme with red brick pillars
It is important to correctly calculate the load on the base so that the fence can withstand the weight of the materials and not begin to crumble.
In addition, it is worth remembering the requirements of SNiP to fences. Detailed recommendations of the current legislation can be found in the article: "What distance should be from the house to the fence of the neighbors."
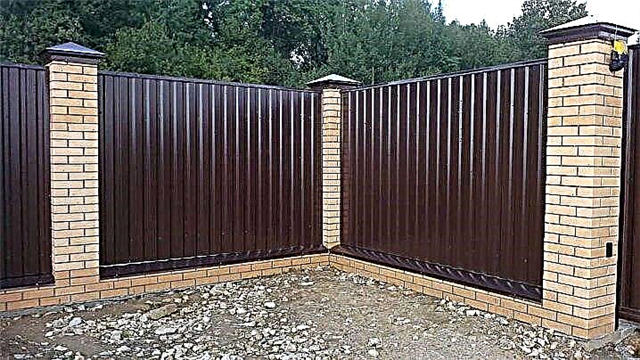
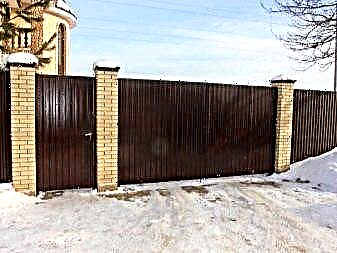
Decking
It goes well with brick pillars. Large selection of colors. Light in weight. It is steady against corrosion. Sheets do not fade in the sun. The price is affordable. Popular among summer residents and owners of private houses. You can make such a fence with your own hands.

The only drawback of such a fence is the mandatory presence of a metal frame on which the sheets will be attached. It is allowed to install corrugated board on a frameless basis, but in this case the structural strength will be much less.
Forging
The fence is characterized by a long service life, aesthetics. Needs no care. In the hands of the master of forged fence can get a real picture, ornament. Any element of the fence is made to order. Cost per 1 square. m ranges from 2500 rubles and above. If necessary, a drawing is developed. But to install such a fence is better with specialists.
Tree
Natural raw materials, which are recommended to be used as a sectional material for hedges, but no more. Wood is subject to decay, therefore it should not come into contact with soil, otherwise the product will have a limited life.
Under the condition of high-quality treatment with antiseptics and other protective compounds, the operating time will be extended to 50 years.


To fill the openings of a wooden fence with brick pillars use:
- evroshtaketnik,
- wicker vine
- boards
- shield frame.
In addition, once every several years, the fence must be re-processed and painted.
Metal profile
Profile pipes are taken as a basis, from which you can erect columns for the fence, and fill the sections with a profiled sheet, slate. Another option is to make a welded structure of rods, pipes, install it between brick, stone columns. Perfectly complement the composition of art forging, created in the selected style.
We select a brick
It is important to remember that the higher the fence, the greater the weight of the masonry on the foundation.
For the bearing capacity of the supports there are no strict requirements for choosing the type of brick. Allowed application:
- silicate
- ceramic
- facing, etc.
Detailed technical characteristics, properties, pros and cons of each type can be found in the article: “Brick Fence”.
The main thing is that the constructed column withstand any lateral loads from gusts of wind or when opening the gate, the gate.
The brick should be intact, without chips and cracks.
The orange ceramic facing bassoon is in demand. The latter creates an imitation of natural stone. If you decide to spread the posts with silicate, then alternating the contrasting colors of white and black or red will look aesthetically pleasing.
How much brick is needed when laying pillars for the fence
To accurately calculate the amount of material for the columns, the height of the fence is divided by the thickness of each stone, taking into account the seam.
So, for a fence of 2 m with pillars 2.2 cm high, a brick with dimensions of 25 * 12 * 6.5 cm is used. We take the average width of the seam - 1 cm.
220 / (6.5 + 1) = 29 rows.
With standard masonry technology, 4 pieces will be left for each row. For the construction of one support, 116 pieces are required, but it is better to take with a margin of 120-122 pcs.
Using the same method, you can calculate how much raw material is needed to create a connecting wall between the supports (if specified in the design).
The free space inside the column is filled with an element of rigidity, which gives the fence strength. They will serve as a profile pipe with a cross section of 12 * 12 cm or a welded structure of metal corners.
To help beginner builders, there are electronic versions of calculators that greatly simplify the calculation process.
What masonry methods should be used
For massive fences with brick pillars, laying in one and a half or two bricks is recommended. Both types are considered optimal for fences from heavy building materials, since they are able to withstand the load from the gate, gate and the structure as a whole.
To strengthen the fence, the rows are reinforced with a metal mesh.
Consider the technique of creating pillars in these ways in more detail.
Two and a half bricks
The masonry is performed in the following sequence:
- The pillar base is formed of 6 bricks stacked with pokes to each other.
- In the second row, 2 outer and 2 halves are placed across the elements of the first row. Between them, you need to install 3 bricks in parallel to each other.
- On the third row of 4 bricks go spoons into spoons at right angles to the first row. In a free opening, put 2 bricks with spoons to the second row, to each other with pokes.
- The fourth row reflects the previous one - it is turned over 360º.
Two by two bricks
The procedure is as follows:
- At the base of the support they put 8 bricks in 2 rows with a jab to each other.
- Then, on the longer side of the column, 2 pieces are placed with pokes at a right angle to the bottom row. In free openings, 4 bricks are placed perpendicular to the side elements. They should go to each other in parallel.
- The next row fully reflects the previous one.
- The latter is formed similarly to the first with the exception of the direction of the bricks. They should go at an angle of 90º to the front row.
Do-it-yourself fencing with brick pillars
As an example, consider a fence from corrugated board.
The amount of brick is calculated according to the formula based on the height of the fence, the thickness of the raw material.
 Span size diagram between fence posts
For the solution you need:
- cement of the M400 brand,
- sand,
- fine gravel or gravel,
- lime.
To knock down the formwork, you need to stock up on wooden boards.
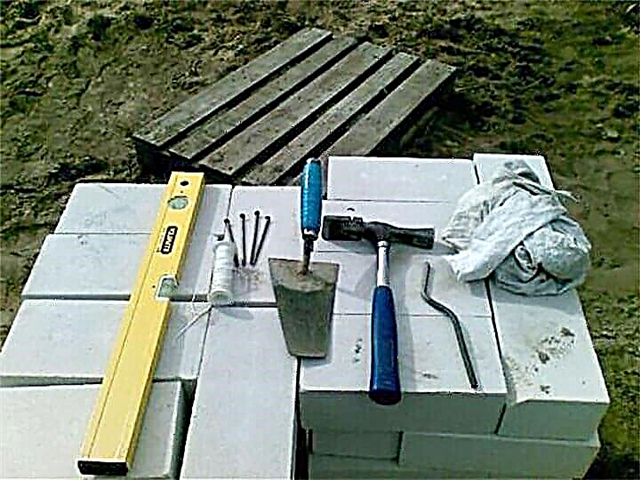
Of the tools useful:
- rope and pegs
- bayonet, shovel,
- building level,
- roulette,
- hammer drill and drill bits for metal,
- hammer,
- welding machine, electrodes, mask,
- screwdriver
- concrete mixer or drill with a whisk,
- spatula, brush.
When all the materials are purchased and the tools are assembled, you can begin the construction process.
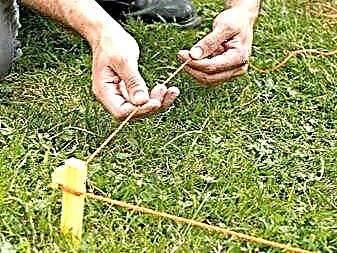
Markup
The first row of pegs should be driven along the perimeter of the future fence and pull the cord tightly between them. The second row of marking is performed parallel to the first, at a distance of half a meter from it.
The distance between the pegs should be equal to the distance between the posts. On average, it is 2‒7 meters.
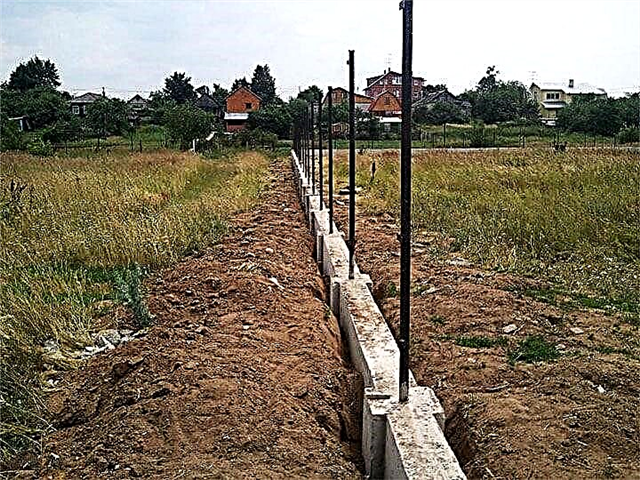
Foundation
Its type is selected based on the relief features of the terrain, dimensions, material of the fence. Columnar should be used on stable soil, in the areas of mounting supports. In the version with brick poles and a professional sheet, it is better to choose a tape. It is poured along the entire length of the future fence.
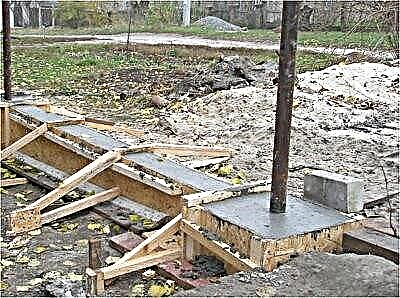
 Preparation of the base and frame for mounting the fence
For high-quality pouring and solidification of the foundation, the work must be completed in one day, filling the solution layer evenly in all areas.
Initially, a trench digs up to 70 cm deep, in the places of installation of pillars from 1 m (in case the fence height is 2 m).
It is worth considering that the depth of the trench under the supports is half their height. Otherwise, when freezing the soil, extrusion, deformation of the posts will occur. The step between the posts should be selected from 2 m or more.
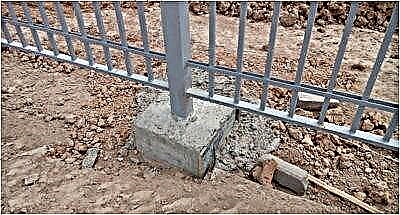
When the trench digging is completed, you need to proceed with the installation of the skeleton of brick supports - the installation of profile pipes. The depth of the hole for the pipe is 30 cm. After fixing the pipe, the opening is covered with gravel, and, if possible, concrete.
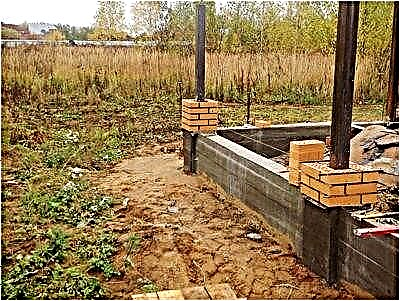
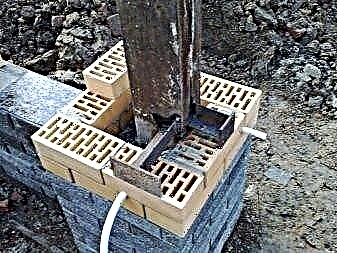
Formwork, reinforcement
The photo shows an example of the formwork of the strip foundation under the fence.
 Photo: formwork assembly, metal profile installation
As a waterproofing, the bottom of the trench is recommended to be covered with plastic wrap.
The formwork is assembled from half-cutting boards. Its ground part should be at least 20 cm.
The trench is reinforced with a metal mesh, rods laid between the pipes. Around the pipes carry out a tying grid.
Quality solution
Knead manually or with a concrete mixer. Moreover, in the latter case, concrete will be 20% stronger and more ductile.
For mixing the mortar, it is necessary to adhere to the following proportions: for 2.5 parts of sand and 3.5 gravel, you will need to take 1 part of cement grade not lower than M400. Water flows gradually until a thick sour cream is obtained.
It is possible to increase the plasticity of concrete by adding liquid soap in the mixture in proportion to cement of not more than 0.2% or buy ready-made plasticizers. Sometimes crushed stone is mixed into the solution.
Pouring
It is carried out within one day. The trench is evenly filled with mortar to the top of the formwork. The prepared volume should be enough to fill the entire foundation. Depending on the depth, concrete hardening takes from 1 to 3 weeks. So that the solution does not crack, it is covered with a plastic film.
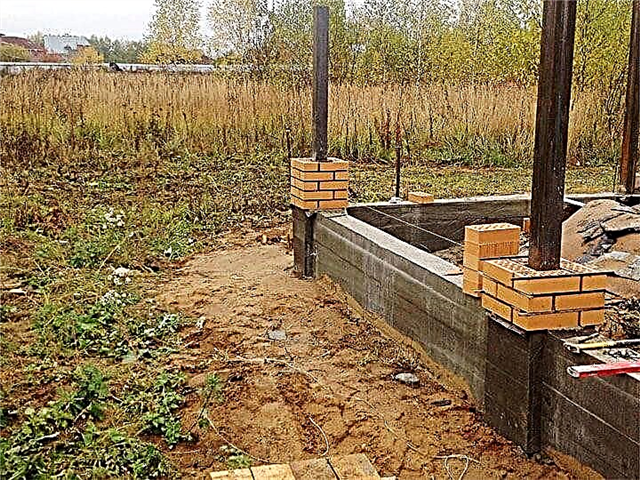
Steel frame
When the base is ready, it is necessary to weld 2 profiles in parallel to the previously mounted support pipes - at the top and bottom of the structure. Sheets are subsequently attached to the corrugated board. The finished frame is cleaned, painted.
Brick masonry
At this stage of construction, you should adhere to the following recommendations:
- The proportion of the solution (cement: sand: lime) is 1: 4: 0.5.
- To get a beautiful black seam, a little soot is added to the mixture.
- The recommended thickness of the seam between the elements is 1 cm. They can be made slightly recessed or, after masonry, separately lay out.
- Each row must be put under the level.
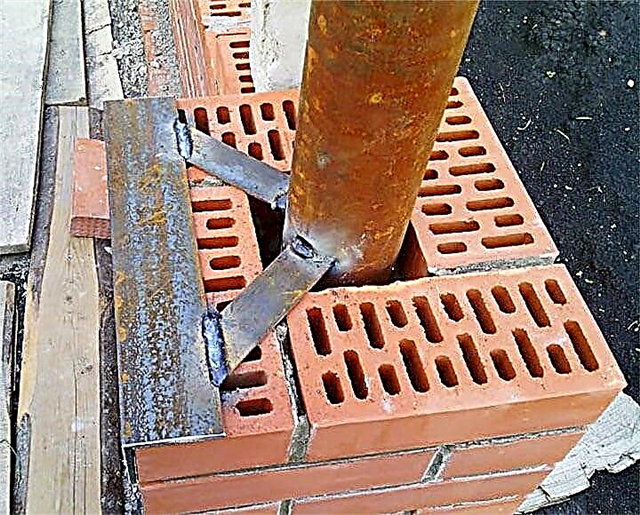
- When erecting poles, it is important not to forget to weld mortgages in the form of plates to the pipe. In the place of installation of the gate they will need 3 pieces: at a distance of 15 cm from the foundation, in the center and at a height of 15 cm from the upper row of masonry.
- The inner part of the column, the pipes are filled with concrete mortar.
On the fastener section of the gate and the gate, it is better to make the masonry in two bricks, in the intermediate sections there will be enough thickness of one and a half bricks.
Installation of sheets, caps
Finished brick pillars should stand for 2 weeks without any load, after which caps are installed on them. Preference should be given to a concrete base. The main purpose of the caps is to protect the inside of the pillars from precipitation, excess moisture. In addition, they will become the aesthetic completion of the composition.
Decking is mounted on the finished welded frame from the profile using a drill and self-tapping screws.
Installation of gates, gates
Thanks to the welded mortgages, it will be easy to fix the swing gates, the gate.
If the buildings on the site are located close to each other, then for the gates you can equip a sliding (sliding) automatic system, which is also attached to side pipes reinforced on the sides. You will need additional elements - dowels, anchors.
Attaching the loops directly to the mortgages is undesirable, since the load will be distributed unevenly. Therefore, it is better to weld the profile to the bracket and already have loops to it.
Then a trial installation of the gate, gate. Locks are put, clamps.
It is difficult to do such work yourself, so you should order the services of a team of specialists who will carry out high-quality installation of the turnkey structure.
If you decide to carry out the entire construction process yourself, we recommend that you follow the advice of the masters, carefully conduct calculations and think through each step of the work in advance.
Selection
The foundation is divided into two categories:
- shallow laying
- deep laying.
Choosing the right option comes down to calculating the depth. It depends on the following criteria:
- Characteristics of load-bearing structures. The main bearing element is the fence itself. It is a self-supporting wall, to which mechanical stresses are attributed: its weight, loads due to precipitation, the location of nearby buildings, pipelines, tunnels.
- Engineering and geological properties - soil quality, groundwater level.
- Weather for a specific area. The degree of freezing depends on it.
The structure has ultimate rigidity. Sensitively reacts to uneven precipitation, contributing to displacements, deformations. As a result, new conditions are formed which, if the project is not prepared correctly, will provoke cracking and destruction.
The foundation must be formed at a depth exceeding the depth of freezing.
There are three varieties:
Tape
It is often used, it can withstand maximum loads, it is built from a continuous tape of concrete pouring, which is buried in the soil. Helps prevent deformation on weakened soil, evenly perceives the load. This is the best choice for brick, stone pillars.
 From corrugated board
It’s easy to build on your own, it will only be costly.
Installation is carried out in a certain sequence:
- Marking the territory. At the corners, rods of reinforcement are placed, a rope is necessarily stretched for orientation. The next marking line is marked 40 cm from the first.
- Identification of height differences. The level helps to determine the lowest point, dripping begins with it.
- Digging a trench. It is formed at a depth of 20-50 cm, sometimes more due to the type of soil, the depth of freezing. The bottom, the walls of the ditch should be aligned, the deviations can be checked and adjusted with a level.
- Pit drilling. Depth depends on the planned height. At 2 m, a 3 m pipe is required; it sinks 1 m into the ground. It is permissible to place a stand made of roofing material in the well.
- The formation of a drainage layer. Sand is poured at the bottom of the ditch, watered from above, rammed. Then a pillow is made of gravel, crushed stone about 15 cm is poured - it helps to protect against heaving due to frost.
- Creation of formwork. A plank formwork is placed in the trench, it is possible from plywood or other sheet building materials. Its height is slightly above the border of the base.
- Reinforcement. The reinforcement is laid in several rows along the height of the foundation, the cells are obtained at least 35 by 35 cm. The intersection zones are fixed with wire.
- Installation of poles. First mounted in the corners. With a length of 20 m, it is still placed in the center of this distance.
If the differences are more than 30 cm, the fence is made stepwise. After the installation of angular supports, as well as additional ones, the distribution and placement of the remaining ones at a distance of 2-3 m is carried out. They are aligned, supported.
- Fill. Concrete is compacted, the upper part must be leveled with a trowel. So that moisture does not evaporate quickly, cracks do not appear, sometimes concrete is wetted with water. It becomes durable in about one month. In dry weather, formwork is dismantled after 7 days.
- The design of the pillars. After pouring, brick.But in advance, the strips are attached to the pipe in order to fix the structure for them. They should stand for the masonry. The distance inside the masonry with the pipe is poured with mortar.
Column-Tape
The combination of the two types of fundamentals is due to financial savings. This will allow you to use less brick in the masonry process. It shows itself well in moving soils. The width around the pillars is several times greater than the width of the trench.
 Column-Tape
Columnar
It is usually used for light-weight barriers formed from corrugated board, netting. Poured under the supports.
This variety is ideal for the clay type of soil when aquifers pass near. Pillars must be immersed below the freezing boundaries.
But on too weak ground should not be done due to the high probability of skewing. This is the most easy and not expensive method, it is very simple to create it yourself.
 Columnar
The installation sequence is as follows:
- The places of supports along the perimeter are revealed. The approximate step is 2-3 m. First, pegs are placed, a wire is pulled along them, the evenness of the markup is checked.
- Drilling of the wells. Their depth corresponds to the height of the fence, the boundaries of the freezing of the soil.
- The formation of a drainage pillow. First, sand is poured, then gravel, the layer is moistened, carefully rammed.
- Installation of formwork. It is required in order to strengthen and increase the pouring area. The pit expands, formwork is put, reinforcement is carried out, filling with concrete solution. This gives increased reliability and allows you to tolerate load reinforcement.
- Pillar preparation. Pipes of metal are first checked for rust, cleaned, and additionally coated with an anti-corrosion compound.
- Concreting. The supports are driven into the drainage, they are checked according to the level, poured with a cement mixture. They are also propped up until they are completely frozen.
Selection criteria
To prevent the problem of deformation of the fence, the following criteria must be taken into account:
- weight,
- soil type
- depth of freezing of the earth.
The weight will match the material used. The fencing of concrete, brick is heavy, so you should choose a tape, combined look.
When constructing a fence from corrugated board, wood, columnar is suitable, that is, concreting only the bases.
 Dimensions, weight
Priming
Land must be taken into account when forming the foundation. On a sandy, peaty, it is better to make a ribbon look with a width of 25 cm, a depth of about 40 cm. The brand is better than M200.
On a clay type of soil, it is better to make a tape or combined version with a width of 25 cm, a depth of 50 m. The depth of the pits is not less than 1.5 m, the concrete grade is the same.
A monolithic tape type is used on the sandy loam with a width of 25 cm, a depth of 50 cm. A sand cushion is formed at the bottom, the brand of the composition is the same.
 Ground Compliance
Freezing depth
The foundation is necessarily poured below the freezing line of the earth, otherwise deformation will soon occur.
When the freezing boundary is low, a floating variety is placed. For this, a trench of 60 cm is formed, the bottom is covered with crushed stone by 10 cm, well compacted, the remaining space is densely filled with sand.
A monolithic reinforced tape 40 cm high, 30 cm wide by design parameters is poured onto the pillow. The monolith is reinforced with rods of 10-12 mm in diameter.
Preparatory work
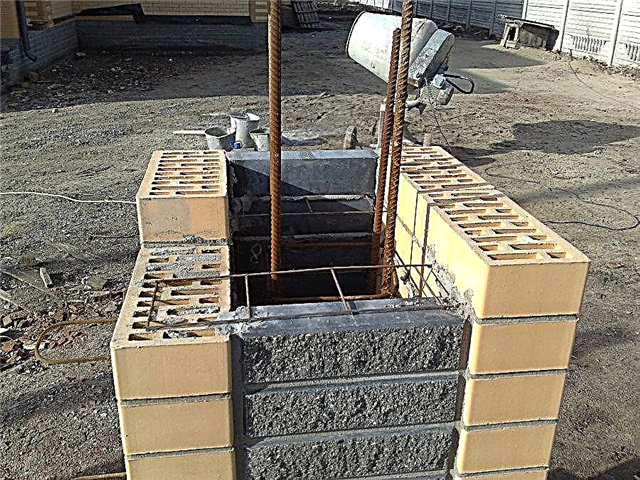
For proper installation, it is necessary to take into account the main nuance - a metal support is placed, it is pre-concreted. This is an ordinary flow pipe, reinforcement from thin corners.
The rod gives the construction reliability and strength, it is then that the brackets for the lag are attached to it.
Reinforcement
To increase strength, reinforcement can be used. This is the so-called skeleton that helps to resist natural processes in the soil, preventing the destruction of the monolith. Reinforcement allows you to distribute the load evenly.
The frame is constructed of reinforcement with corrugations of 12 mm in diameter. Due to the presence of notches on the rods, good adhesion occurs. For a transverse connection, a wire of 6-8 cm in diameter is used.
Frames are built first on the ground, only then placed in a trench. The fittings are arranged in parallel, connected by shorties to each other at a distance of 50 cm. Finished halves are connected to form a rectangle.
 Reinforcement
The frame does not sink completely to the bottom, does not touch the partition walls of the formwork or should be lower than 5-7 cm than the upper border of the slab. In the places of installation of the supports, holes 80-150 cm deep are pre-made, a 40 cm profile tube is placed there. The support is attached to the frame to obtain a monolithic structure.
Concreting
The volume of concrete must be calculated so that the pouring can be carried out in one approach. This will help to avoid the presence of joints in large numbers. When pouring, it is necessary to compact the solution well so that the air comes out from under it. After completion of work, it is required to cover the surface from sunlight - with a tarp, and periodically pour water over it.
The aboveground part is organized using formwork. It is good when its height is 10 cm and more. The formwork is taken out only after the final solution solidifies, it takes more than a week.
If a stone base is formed, the stones are rammed close to each other at the bottom of the trench. Then they are slowly poured with concrete mixture. The aerial part is placed with extreme care to maintain an attractive surface appearance.
When planning brick supports, it is important to make sure that there is a foundation under them. The required power will correspond to the materials used for spans.
With a clear adherence to technology, the fence will stand for a long time.
Often asbestos-cement pipes, roofing material are used as glasses under the supports. Wells are filled with concrete, rammed, pierced by a rod from the reinforcement.
A week after strengthening, you can start filling the tape.
Features
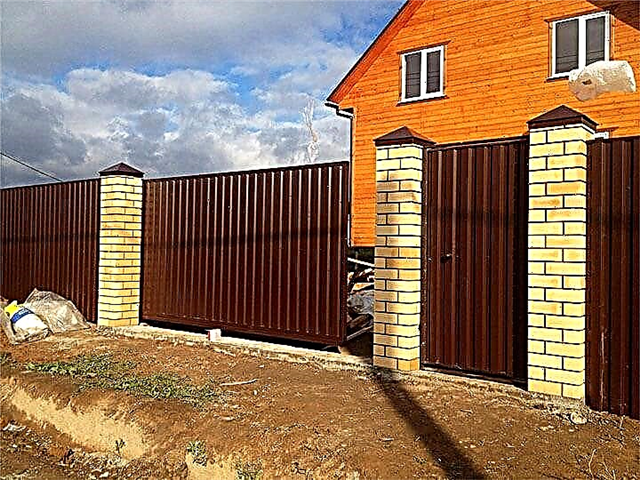
A fence with brick pillars provides the necessary level of security against unwanted intrusions into the estate. Spans from corrugated board or brickwork, mounted on brick poles, can add impermeability and reliability of the protective function of the fence.
Forged and wooden spans will give external lightness to the structure, while maintaining the necessary level of isolation from the external environment.

Brick supports have durability and weather resistance. They are quite resistant to increased payload for installing massive gates with automatic sliding or mechanical swing devices.
To extend the life of the pillars, they need to be covered with caps made of metal or concrete. It should be borne in mind that concrete caps have a greater variety of shapes, but they themselves are destroyed by changes in temperature and humidity.


Metal caps better insulate the brickwork from moisture.
A fence on brick poles, providing a sufficient level of protection, is more affordable than a fully bricked fence. The types of bricks, the pattern of masonry and the material of the spans give great scope for decorative creativity in the design of such a fence. Brick pillars can be safely equipped with an electric cable to organize lighting of individual supports, which will be convenient for owners and will serve as an additional decor.

Types of structures
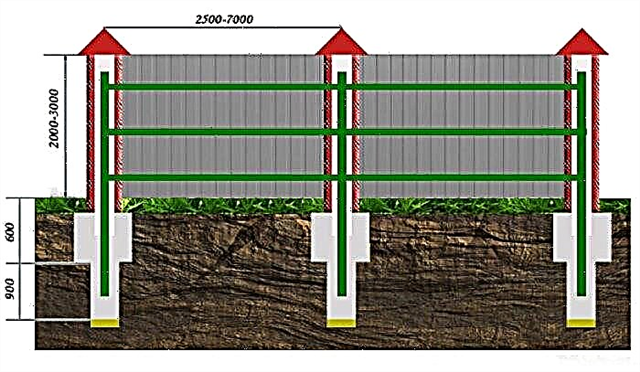
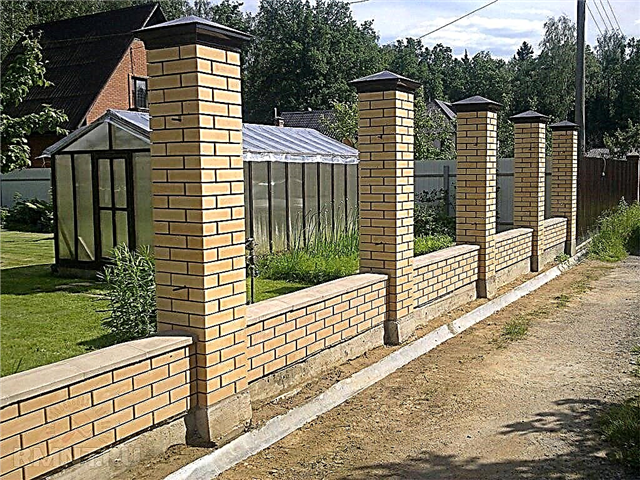
To erect a fence with brick supports, you need to determine the type and height of the structure. The optimal height of the supports is selected about two meters, then the pillar is laid out with a width of 1.5 bricks, together with the seams this is 38 centimeters.

If necessary, you can increase the height to 3-4 meters, then the masonry is best done in two or more bricks. In this case, the column size will be about 50 to 50 centimeters. The width of the span has a range from 2.5 to 6 meters, the sizes are selected according to the relief or composition of the fence.
The type of foundation depends on the type of construction: tape or point. For spans of lighter materials, a point foundation is chosen for bricks made of bricks, for heavy ones - a strip foundation.

Spans from corrugated board - the most common option.
Benefits:
- Such a fence has an external conciseness and ease of installation.
- You can choose the right color scheme.
- With such spans, caps of a geometric shape look beautiful.
- Convenient to mount the gate.
Under this type of fence make a strip foundation. You can stay on point supports, but wear resistance and decorative qualities will be reduced.
For the fence with forged inserts, you can also use the first and second version of the supports. Of course, forging gives the fence an artistic value and emphasizes the welfare of the owners. A strip foundation with several rows of bricks will give solidity to the fence. The airiness of the structure appears when the strip foundation is abandoned, but the functions of durability, reliable protection and decorativeness are preserved.


The next popular type of fences were spans from a wooden and metal fence. It is also possible to use two types of foundation. The picket can be located both vertically and horizontally.
The fence can be completely laid out of brick or torn decorative stone, such fences are made on a reinforced foundation, they reliably isolate the land tenure. For a decorative effect, combined fences are performed.


After choosing the type of fence, proceed to the selection of material.
Material selection
The material for spans is chosen according to the degree of protection required: for better insulation - profiled sheet or brick, for decorative effect - metal forging, in rural courtyards a wooden or metal picket fence has proven itself as a protection against cold winds and unwanted intrusions.


The material of the fence should be in harmony with the architecture of outbuildings and the general concept of the design of the site. Classical mansions harmoniously look with wrought-iron or stone fences. It is better to fence the house in ethnic style with a fence using a wooden fence. In areas where poultry or other animals are kept, solid fences from corrugated board will be optimal.
In modern minimalist trends, it is better to use a fence with a minimum of decor. Simple and elegant. Such fences are decorated with spans made of special glass or plastic.
Brick for columns is selected based on the overall design of the fence. For the first two or three rows, ordinary clay brick will be required, then hollow or the same as in the bottom row is used. To enhance the decorative effect, the columns are laid out with clinker bricks or facing bricks of the desired color in various combinations.


Embossed brick gives greater expressiveness to the architecture of the fence. Decorative decoration can be applied only on the front side of the fence, and leave the inside in the form of a simple brickwork. This will give tangible savings.
By the number of columns, steel pipes are purchased, which will become the vertical axis for reinforcing the brickwork. It should be noted that in the posts for gates and gates the supporting reinforcement is purchased reinforced profile. Reinforcement will be required to strengthen the foundation, its amount is calculated based on the need for a tape or point arrangement.
Building aggregates will be needed: cement, sand, crushed stone or expanded clay. It will be necessary to stock up boards for the manufacture of formwork. Since the brick absorbs moisture very well, and when it freezes, it destroys the structure of the material, all brick structures will have to be protected from soil moisture, therefore, material for waterproofing will be needed.
The calculation of the amount of necessary materials is carried out according to the length of the fence, the pitch of the brick supports and their size.
For a standard column of one and a half bricks with a height of 2 meters, 110 pieces of brick will be required.
Styling technology
- The first step is to mark the contour of the fence with twine. In places of future supports, pegs are driven in. For a pile foundation, a hole 30-35 centimeters wide and 80 centimeters deep for sandy soil is made from the marks with pegs using a drill, and for clay soils, up to a freezing layer plus 20 centimeters.

In central Russia, it is best to withstand a depth of 1 meter or 1 meter of 20 centimeters. A bucket of rubble is poured into this pit and rammed. By the diameter of the pit, formwork is made, you can roll a tube of the desired diameter from the roofing material. A steel pipe is inserted into this formwork and poured with a cement mixture.
A mixture of cement and sand is made in a ratio of 1: 5 or 1: 6, for plasticity, you can add a little liquid soap. The solution should not be liquid or dry, so water is added gradually. The upper part of the foundation is poured into the formwork along the width of the column. For a strip foundation, a trench 50 cm deep and 40 cm wide is dug between the posts. The bottom layer is strengthened by a pillow of gravel, along the trench a formwork of boards is installed and filled with mortar.


- After pouring the foundation, the brickwork is started no earlier than 2 weeks later. The foundation surface is covered with waterproofing material so that the brick does not absorb moisture from the soil. Roofing material can be used here, but bituminous hydroisol is a more modern material.
- Corners, ears for a canopy of a gate are welded onto a steel pipe or transverse pipes are welded to secure the span material - a picket fence, profiled sheet or forging.


- The next stage of work is masonry. Here you need to carefully consider the quality of the solution, its density. For the sample, put a little mortar on the brick, it should not spread. Bricks are laid according to the masonry scheme with dressing through a row around a steel pipe. The first and second rows are laid with the usual full brick, for the next you can use lightweight hollow.

- A layer of cement mortar with a thickness of 1 centimeter is applied to the waterproofing, and bricks begin to be laid on this layer, each brick is tapped for sealing with a rubber hammer. For uniform adhesion to the solution, the brick is pre-dipped in water. It is better to measure each row with a tape measure, since an offset of even a few millimeters of each row can lead to a distortion of the column or to an extension of several centimeters.
Each side should be checked regularly with a level to avoid deviation from the vertical.

- If desired, you can make decorative joints, usually dye or textured chips are added to the cement mortar, and after the end of the masonry, the joints are separately greased. This gives accuracy and completeness to the entire building.
- After laying the entire pillar, the middle part around the pipe is filled with a solution, you can fill it with gravel and fill it with a more liquid solution. The top is again covered with a waterproofing layer.

- A cap made of metal or concrete is reinforced at the top of the structure. Manufacturers offer a wide variety of shapes, colors and materials for the manufacture of such caps. A simple rectangular cap can be made of a sheet of metal yourself according to the pattern. Color is selected according to the color of the fence design.

- If the project provides for combined masonry, then you must carefully select the dimensions of the main and finishing bricks. If the brick pillar is finished with natural stone, then after the masonry dries, the finishing layer is applied.
- The next step is to hang the span material: profiled sheet, metal grill, picket fence or laying out the span with decorative brick.
- The final type of work is the installation of gates and gates, installation of lighting.

Professional Tips
A few tips for making masonry will help to perform it efficiently even for a novice master:
- So that the seams between the rows of bricks were the same thickness, a metal rod of the desired diameter is laid along the edge. Cement mortar is leveled along it, bricks are laid on top, tapped with a rubber hammer, then the rod is removed and laid on the next row.

- To maintain the perpendicularity of the corners, it is worth using a metal corner. Such a corner is fixed with screws to the seam and, after several rows of masonry, is transferred higher. The construction level must be applied to all sides of the pillar, it is better to have two levels and measure adjacent sides along them in order to avoid twisting of the masonry.
- It will not be easy for beginners to immediately achieve the required quality of brickwork, but after making one column, you need to take into account errors and further work will go faster. By laying out the columns yourself, you can significantly save and add more decorative details.
Beautiful options
For complex construction work, it is still better to invite professionals with experience in various decorative finishing materials. The presence of specialists is necessary to equip the fence with lights and automatic gates. Here it is necessary to comply with the safety rules for laying electrical cables and organizing competent lighting. A beautiful and safe fence will ensure a quiet flow of life inside the site.

Perform a stone fence with metal inserts at a decent level will help special skills and experience.
A horizontal picket fence, matched in tone with the main buildings of the estate, looks modern.
The wrought-iron fence, entwined with a green vine, looks very beautiful.


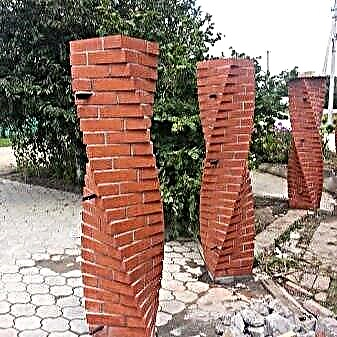
The twisted structure of the brick pillar makes such supports in the decoration of the site.
Brick pillars decorated with round stone with white spans are a stylish and sophisticated fence.

You can find out how to make a fence of brick columns and a profiled sheet by watching the video a little lower.
Design a beautiful brick fence - where to start?
The decision is made, the project is developed - where to start? The first thing you need to build is the pillars of brick for the fence. To understand how they should be done, you need to:
- Assess the type of soil.
- To think over - what will be the central part: wooden, from euro-frame, profiled sheet, metal, figure-forged, concrete.
- Mark where the gates will be.
- Designate the size of each section, establish temporary designations in place of future posts.
It is necessary to take into account the state of the soil at the place of installation of brick pillars for the fence, the establishment of a more solid structure or a standard sample depends on this.
Do not neglect this point - if you do not want to collide after some time with the restoration of the fence due to its collapse, inclination, cracks in its base, along the entire length and other things. If the soil is not stable, displacement may occur over time, which will also pull the structures installed at this location. In such options, they make a more complex, robust structure that will withstand the unstable position of the earth's surface, where it is mounted.

A reliable concrete base ensures that the fence stands upright and does not warp for many years
At the initial stage - design, it is necessary to indicate the height of the fence, which is planned to be built, the dimensions and what will be the core of the fence. What severity will be based on the foundation may also depend on this, which indicates the complexity of the process of reinforcing this structure. If you plan to make a high fence, then there should be more brickwork, which rests on the base.
The design and appearance of the fence must be thought out in advance
For a solid load-bearing structure, it does not matter what type of brick will be used, but it is important that the pillars take on a confident lateral load, which will take on a break. This may be the case - if the place where such a fence is installed is strongly exposed to atmospheric influences, and in particular - it must withstand strong winds. Fluctuations from opening and closing gates, gates - are also important.

The distance between the brick pillars is selected individually depending on the structure of the fence sections.
In order for the fence to withstand such loads, you need:
- Make more massive masonry.
- Mount iron rods at the base of the posts, which should also be connected to the foundation.
- Mount the profile pipe in the base of the column.
The most popular way is the latter option, since it is less costly in cash and not so laborious. Gates, wickets can be directly attached to the profile pipe, which will reduce the load on the brickwork.

Profile pipe significantly enhances the strength of the brick pillar
The profile can be replaced with reinforcement followed by pouring concrete composition
Masonry fence posts: technology
A fence with brick pillars can stand on such a basis: columnar or tape.
Columnar fence pattern

Tape-based fence pattern
In the first option, it can rely on a layer of earth that will not sag, and in the second - on the entire length of the fence. The tape method is used if the base of the fence is heavy, that is, it is made of concrete, stone or other materials.
A strip foundation is needed if it is planned to erect a fence with a brick base
With the usual column method, you need to dig a hole with a width of 35-45 cm. Where the columns will be installed, you need to make a deeper hole. Fill rubble to the bottom. Insert a profile pipe of the required length into the pits for the posts and cover the base with stones. Using a metal profile of a periodic type, make a grid with cells 15 cm wide and weld to the bottom of the pipe in the pit.

Around the pit, it is necessary to make the formwork from the boards
Pour all cement mortar, including trenches between the pillars. Mortar mortar is made in the following proportion:
| Cement | Sand | Lime |
| 1 bucket | 4 buckets | 0.5 buckets |
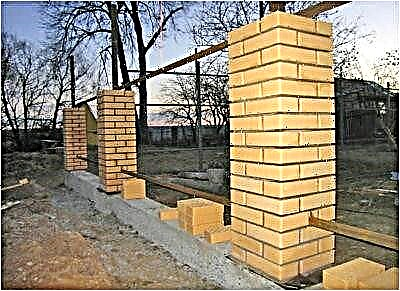
After hardening and curing, pillars are laid.

The concrete poured columns are left motionless until the mortar completely dries.
To maintain a distance (seam) of 1 cm between the brickwork. A level should be used for checking. When laying bricks, for the stability of the structure, it is necessary to weld metal plates at equal distances. The hollow profile pipe also needs to be filled with cement mortar.


After laying the pillars, proceed with the installation of the fence sections
After the pillars are erected, a cap must be put on top of them to prevent moisture from entering the column. It is possible to make the core of the fence only after 15 days.

Caps for poles can be purchased ready-made or made independently from galvanized sheet
Results of successful and erroneous decisions - selection of photos
A beautiful design move will be to install lamps on the top of the columns. It can be both a design solution and a practical one.

Stylish design of a brick pillar with a cap with a lamp
Art forging in the core of such a fence will not only look stylish, but will also show the taste of its owner.
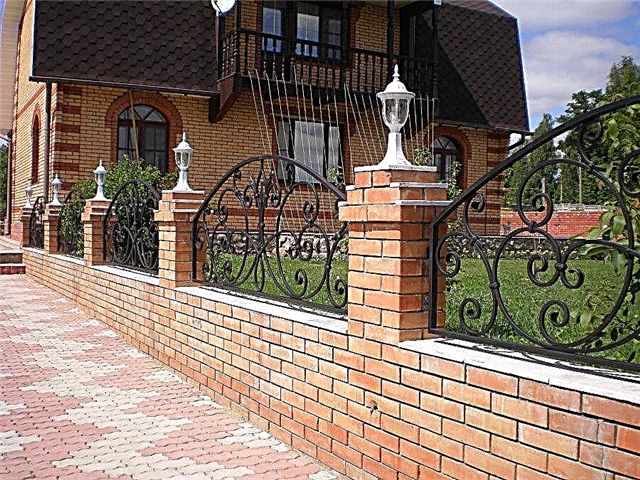
Forged elements can be of completely different shapes and sizes.
Also with forged tips you can decorate the upper part of the columns and around the perimeter of the fence - it is beautiful, and can serve as a security system from criminals who can climb over the fence.

The combination of brick pillars and wooden sections looks no less attractive